Off Grid Ham: Cheap & Easy Portable Antenna Hacks

Chris Warren at Off Grid Ham talks about Cheap & Easy Portable Antenna Hacks in the article below. When I run off battery power or away from home, I tend to use a Buddipole portable antenna system. The first time I set it up, I was able to tune into a pileup on an operator in Ukraine, and I’ve been pretty happy with it since then. However, you need to think about how and why you’ll be using your radio off grid. My Buddipole antenna is portable, but not so portable that I’d want to backpack it in somewhere with my radio and camping gear. Additionally, unless you are most worried about an EMP taking out North America, in most situations you don’t need to be able to talk halfway around the world.

Wire and wire dipole antennas can be cheap and light. If you only want to talk to radio operators in your state or couple of hundred mile around, you don’t need to mount the antenna very high. And if you only want to listen, you can lay your wire right on the ground. There is also a ton of information on the internet about building wire antennas. I’ll put a YouTube video at the bottom.

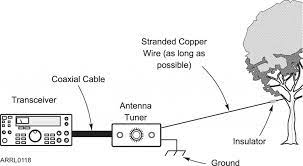
It’s a little unclear the way Chris wrote about baluns and ununs, but the need for either is based on both the feedline to the antenna system and the antenna itself. Chris is writing about using coaxial cable as the feedline, which is unbalanced. If you were using ladder line, that would be a balanced line. So feeding a dipole, which is balanced, from Coax, which is unbalanced, would be aided by a balun (balanced to unbalanced). Feeding dipole, again balanced, using ladder line, which is balanced would not need either. Feeding a random wire, which would be unbalanced, using coax, which is unbalanced, could use an unun (unbalanced to unbalanced). And feeding an unbalanced random wire antenna with balanced ladder line could be aided by a balun.

All that said, if your radio itself isn’t putting out balanced output, then a balun or unun may still improve things for you. Additionally, just because you’re going from coax to a dipole doesn’t mean that you have to have a balun to talk to anyone. Having a balun may reduce noise and keep unwanted RF out of your operating shack (if you’re using one), but not having one may not impede your ability to communicate as needed. These kinds of things are part of the reason why people who use radios a lot continually tell preppers not to just buy a radio thinking that they’ll be able to unbox it and use it perfectly when the emergency happens. Yes, you may be able to unpack your Baofeng HT, and it may work properly out of the box, but it may not perform the way you need it to if you haven’t tested it and made adjustments.

I don’t do a lot of antenna articles because there is already so much information in circulation I can’t see much ground left to cover, at least that’s what I thought until new Off Grid Ham reader Rick sent a nice email that inspired this article. What are some cheap and easy ideas to make a portable antenna better, from an off grid perspective?

The off grid niche. portable antenna

To rehash the obvious, running off grid radio does not require a “special” antenna. Whatever works for conventionally-powered stations will also work off grid. However, off gridders tend to have different needs and operating goals. Some antennas fit these needs and goals better than others. portable antenna

I know from my own operating experience, running this blog for over seven years, and talking with other hams, that off grid amateurs disproportionally use QRP, lean towards portable operations (outdoors), and are less focused on having a big signal for the purpose of DX, contests, & awards. They also, by a very large margin, are involved with the survivalist/prepper movement and/or EMCOMM on some level.

If you are into amateur radio in whole or in part because you want communications when SHTF, then your equipment choices are going to be different from the guy who is a contester, DXer, or thinks it’s just a fun hobby. An analysis of those two demographics might itself be worthy of an entire Off Grid Ham article.

From the abstract to the real.

Now that we’ve lightly touched on the sociology and psychology of why operators may choose different equipment, the next question is “what are my options?” Your options as an off gridder are are for the most part the same as they are for everyone else. You’ll just have to make a few adaptations. As we have discussed many, many times on this blog, there will be tradeoffs and compromises. Here are a few ideas with a “cheap & easy” goal in mind:

The wire antenna. portable antenna

Perhaps the most fundamental of all antennas, the dipole has been around almost as long as radio itself. There are a few things an operator can do to make it more off-grid friendly. These ideas can apply to all other wire antennas too:

Lose some weight!

If you are running QRP power levels, there is no compelling reason to have a dipole with heavy gauge (16 or less) wire. Wire sizes between 18-22 gauge are perfectly acceptable for QRP. It’s less expensive, easy to work with, and coils nicely for easy transport.

Speaker wire is a popular material for light weight antennas. It’s easy to find and not particularly expensive. It would be a great choice. But there is something better. Much better.

The “holy grail” of off grid antenna wire.

The top of the QRP antenna wire pyramid is 22 gauge central office frame wire (sometimes referred to as cross connect wire). CO frame wire is incredibly strong for its size and does not easily stretch. It comes in a twisted pair. There is no need to separate the pair. Simply strip the insulation and terminate the bare wires together at each end. This turns the twisted pair into what is effectively one single conductor. The twist will have no meaningful effect on your send or receive signal.

Unfortunately, CO frame wire is used only by the telecommunications industry and is very hard to find for sale to the public. It can occasionally be found at swap meets. I was able to source this wire through my professional affiliations and can confirm that it makes a fantastic light weight antenna material.

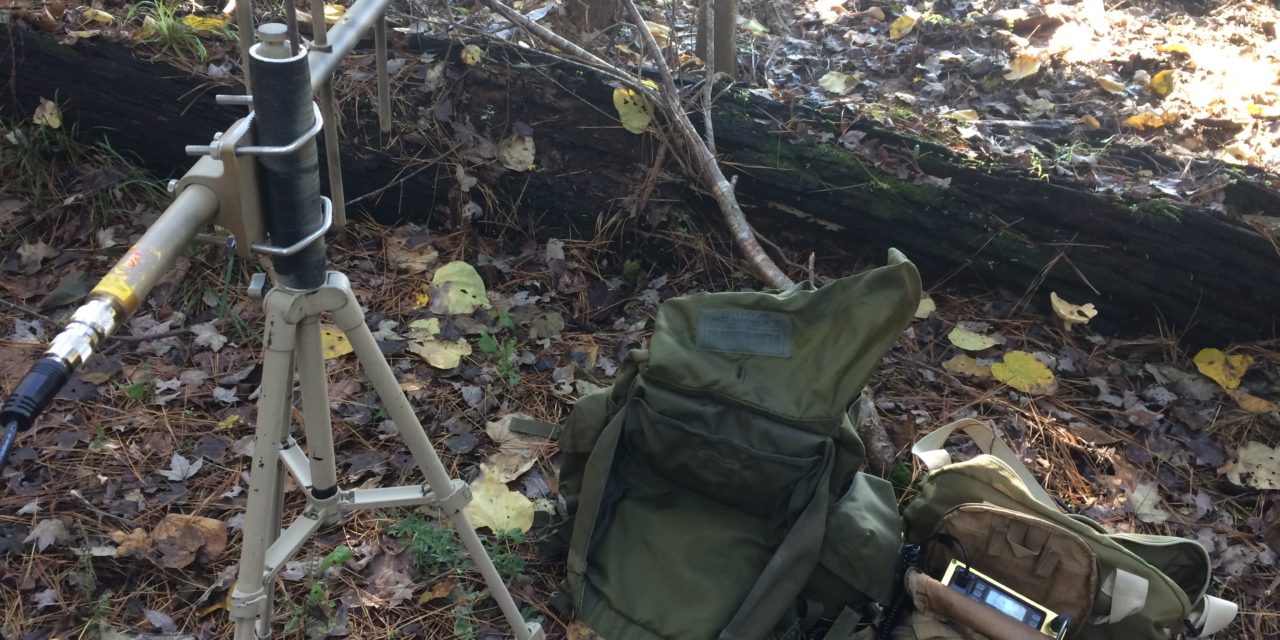
The photo below is a 20 meter central office frame wire dipole with balun, rolled up for transport. It weighs 9.6 ounces (0.272 kg) including the balun and fits in a plastic sandwich bag.

Many hams work for the phone company, or have connections. Ask around. If all else fails, you’ve got nothing to lose by knocking on the door of your local central office and simply asking  the tech if you can have some frame wire. He/she will know what you are talking about. Every year they pay contractors to haul away thousands of feet of the stuff to the scrap yard, so it’s not a big deal to give some away. Many telephone central offices are not manned full time so you may have to make a few attempts to catch someone while they are there. Since techs set aside unwanted wire for recycling, “dumpster diving” will not likely produce any results. In any case, it will be well worth your effort if you can find some.

If you cannot source central office frame wire, light gauge speaker or doorbell wire will work just fine but will not be as strong and stretch resistant.

Baluns and ununs.

Almost any antenna fed by coax can be improved by adding a balun or a unun. These devices are essentially transformers that manage the impedance difference between your feedline and the antenna and prevent common mode current. Common mode current is undesirable RF energy that flows along the outer braid or shield of the coax; it contributes to inefficiency and poor antenna performance.

A balun is used on antennas where all elements are the same length, such as a dipole. A unun is used on antennas where the elements are not the same length, such as a random long wire…(article continues)

And here’s a video on building a 20m dipole antenna.

Off Grid Ham: Portable Antennas For The Off Grid Ham

Wire antenna. Courtesy ARRL.org

Chris Warren at Off Grid Ham has a nice, longish article on Portable Antennas For The Off Grid Ham. Please see Chris’s article on his site for the helpful antenna diagrams.

We’re not special.

Off grid amateurs spend a lot of time focusing on the power source for their equipment. While that’s understandable, we musn’t be distracted from the rest of the amateur radio chain. This time we’re going to look at the other end of the system: portable antennas.

To be clear, off grid radio does not require a “special” antenna. Any antenna that can be used for conventionally-powered operating can be used for off grid. Since most off grid radio is done in a portable/temporary/outdoor setting, or for survival/prepper/EMCOMM purposes, some antennas are more suitable than others. Operators who live in apartments, have HOA restrictions, spouse objections, or otherwise cannot have a permanently mounted antenna are in this mix too. Portable Antennas

It’s not practical to go over every possible option as there are dozens of them; we’ll cover the pros and cons of a few of the most popular. If you’re a newcomer to amateur radio, you’ll gain some focus about different antenna choices. At the end of this article I will include links to more detailed information.

A word about portability. Portable Antennas

The definition of “portable” varies considerably depending on who you ask. “Portable” can mean anything from a large trailer full of equipment to a handheld radio in a shirt pocket. It’s up to each individual operator to decide what works for them. Most of the antennas described in this article are not “portable” in the sense that one could back pack all day with it (along with all their other gear). They will all fit in an average car and can be hand carried short distances.

The classic random wire.

There is hardly anything simpler, less expensive, and easier to understand than the random long wire. This antenna has been around since the beginning of radio and is still used today. They can be made from any conductive wire and erected in any fashion…

If you’re going with a random long wire antenna, you’ll need a separate antenna tuner. The integrated antenna tuners on modern radios will not likely be enough. You can try it and you might get lucky, but very few internal antenna tuners have enough range of correction to get a random wire down to the 50 ohm load the radio requires. I have an external tuner that feeds an unun with a ground plane wire for my random wire antenna; that modified setup works well plugged into my FT-817. Portable Antennas

The tradeoff for ease & simplicity is inefficiency. The antenna tuner does not “fix” this problem. Whatever losses are inherent to your random wire will still be there.

Other random wire considerations.

You’ll also have to consider that random wires are not self-supporting. How do you plan on getting your antenna off the ground? You can bring a PVC pipe or telescoping mast but lugging it along that may not fit with your definition of “portability”. Another option is to run your random wire up to a tree. That too may be problematic. Is there a suitable tree at your operating site? Be aware that many public parks in the United States prohibit attaching anything to the trees, even temporarily.

Some hams advise cutting the wire to be a certain length, or to avoid a certain length. This is done to make the antenna work better across all the bands. That’s fine, but then it’s not really a “random” wire. This may seem like semantic nitpicking  but if you are going to cut a wire to a specific length you may as well take it all the way and make a proper end fed or dipole antenna. My wire antenna truly is random; I have no idea exactly how long it is. For all its faults, random wires really do work, and there’s no beating the low cost and simplicity.

The magnetic loop. Portable Antennas

The magnetic loop is one of the most beloved and hated antennas in all of hamdom. I’m not sure why, but every time it comes up in conversation, strong opinions fly back and forth.

Magnetic loop antennas are a conductive loop, a variable capacitor, and a smaller coupling loop. The loop can vary in size, with some versions having less than a three foot diameter. In spite of their small size and odd appearance, mag loops are quite effective. Magnetic loops do not require a tuner and are excellent for restricted space applications, such as apartments, motorhomes, etc. One of the big benefits of magnetic loops is they do not need to be mounted high off the ground. Any elevation greater than one loop diameter is just as good as mounting it on a 100 foot tower.

Magnetic loop disadvantages.

Mag loop antennas have narrow bandwidth. This has a lot to do with the “Q” value of the antenna, which in turn is related to the antenna’s small size, but that’s more than we’ll get into this time around. If you change your transmit frequency, even a little, the antenna will need to be re-tuned. Therefore, you will need easy physical access to the loop. There are commercially made mag loops such as the MFJ-1788 with a remote tuning head. It’s an expensive option, so consider your needs and wants carefully. Also, mag loops will have very high exposed voltages, even at low transmit power levels. Although it’s not necessarily dangerous, if you touch a mag loop while it’s energized, you’ll likely get a very memorable jolt! Keep it away from children, pets, and untrained bystanders.

If you prefer to build you own, the internet is full of plans and tips for DIY versions. By the way, the loop does not have to be a perfect circle, or even be a circle at all. Octagons and other shapes are acceptable. Portable Antennas

In my opinion, magnetic loop antennas are highly underrated. Once you learn its quirky ways it will provide excellent results.

Vertical antennas.

Commercially made portable vertical antennas might be the most popular antenna for off gridders. There are many choices: Buddistick, Alpha Antenna, Chameleon, and others. They generally do not require a tuner and will operate over numerous bands. Unlike mag loops, verticals maintain good bandwidth without constant adjustments. And unlike random wires, they do not take up much linear space when deployed. They’re easy to set up and take down and self supporting. There’s a lot to love here. I personally use an Alpha Antenna FMJ and I must say it delivers on its promises.

The main disadvantage is the cost. Commercially made portable antennas are pretty dang expensive for what you are getting. I realize a lot of the price tag is related to research & development expenses, plus the relatively low production runs of these products. Because portable antennas can be a serious financial commitment for the average operator, it’s important to do your homework and make sure you’re getting an antenna that is appropriate for your operating goals. Portable Antennas

Everything else.

There are so many other antennas that we can’t realistically go through them all here. Some of these antennas are quite effective, others not so much. Still others are just more complicated versions of well established designs. Experimenting is a big part of the fun, so don’t be afraid to take a chance. Home brew antennas are typically inexpensive and can be recycled into something else if they don’t work out.

Resources.

Here is an Off Grid Ham article from 2016 that goes into detail about random wire antennas, including notes on how to build your own.

This awesome database gives DIY plans for over four hundred antennas. It’s one of my favorite antenna resources and I highly recommend you bookmark this one.

This lengthy (33 page) PDF goes into deep detail about magnetic loop antennas, including operating theory. If you are or want to be a mag loop geek, this one’s for you!

Here’s another very well written and illustrated article about mag loops.

Here is a handy on line mag loop calculator if you want to take a stab at building your own.

The Villages Amateur Radio Club published this very well done guide to stealth antennas for those living in HOAs, apartments, etc.

Finally, an easy to understand explanation of antenna Q values. 

Brushbeater Courses in WA State, Apr-May 2022

Brushbeater will be teaching several of their classes in Washington State at the end of April and early May. These will be held in the vicinity of Yakima. Forward all inquiries to: brushbeater@tutanota.com

Scout Course – April 29 – May 1, 2022

Three day class covers the basics of scouting and reconnaissance for irregular or unsupported forces. Course focuses first on marksmanship to 400 meters, personal camouflage and ghillie suit construction, individual and team movement, observation techniques, practical range cards, target acquisition, and basic wilderness survival in an off-grid encampment. By the end of the course, students will demonstrate abilities required for functioning as a small team to effectively locate and engage a simulated enemy, replicating real-world guerrilla operations.

RTO / ADV RTO / Signals Intelligence – May 3 – 8, 2022

RTO:

This class will teach students the basics of communications at the Team or Squad Level in the field. Topics of instruction include:

  • Identifying Equipment Requirements
  • Writing a Signals Operating Index
  • PACE Planning for Communications
  • Basic equipment capabilities
  • Traffic handling
  • Improvised antenna types, uses and construction
  • Setting up and running an NVIS HF station
  • Message Formats
  • Setting up and communicating from a field site

Two day course will culminate in an field training event running a TOC station and Hide site in the field. Students will each build an antenna and demonstrate competency in team communications basics during the field exercise. Amateur Radio license qualification is helpful, but not required. This is NOT a ‘ham radio’ class but each student will come away with a basic understanding of a team’s communications needs in a tactical environment and how to best meet them under less-than-ideal circumstances. No equipment is required for this course; however, if students want to get field practice with their own gear, it is highly encouraged but done so at their own risk. Instruction is completely off-grid.

Advanced RTO:

Two day class picks up where the RTO Basic Course leaves off, covering advanced techniques for clandestine communications in the field. Points of instruction include:

  • Advanced SOI planning
  • creating a brevity matrix
  • Planning and coordinating a dedicated transmitting site
  • Theory, construction and use of directional wire antennas
  • Recognizing and mitigating signs of Electronic Warfare
  • Advanced HF Techniques

As with RTO Basic, the course will culminate in a field exercise where students demonstrate the concepts covered in a live environment. By the end of both courses, students will be able to build a bulletproof communications network with even the most basic off the shelf equipment and little, if any, external support.

Signals Intelligence:

Two day course covers the essentials of signals collection and analysis in an asymmetric warfare environment. Course specifically focuses on building skills to better prepare a retreat or small unit for intercepting and exploiting an OPFOR’s ground communications. Students will learn:

  • Communications Mapping of your Area of Operations
  • Common, Off The Shelf tools for Signals Intelligence
  • Planning and construction of Listening Posts
  • Radio Direction Finding (RDF) Techniques
  • Signals Interception and Analysis
  • Coordinating with an Analysis and Control Element (ACE)
  • Tactical Exploitation

Each student in class will receive open source tools for conducting signals intelligence. At a minimum every student will come away with the essential skills needed to receive possible early warnings or simply stay abreast of problems in their area of interest or potential threats to their patrol.

American Partisan: HF NVIS Antenna

NC Scout of American Partisan talks about the HF NVIS Antenna.  Also check out a follow up post here.

In the last Radio Contra I discussed a simple way of rigging up an antenna for NVIS HF use. Its a topic that gets a lot of attention, and in turn, a lot of confusion. But trust me, its simple. The whole point behind HF is creating regional communications- anything that’s beyond line of sight– and while you can spend a heck of a lot of money in a hurry and not get a lot, you can spend just a few bucks and with a little knowhow I’m about to impart here, have a great setup.

NVIS relies on sending as much of your radiated energy skyward as possible, with as close to a zero degree takeoff as possible. So, this means a horizontal antenna close to the ground. In case you’re wondering, the takeoff angle is perpendicular to the orientation of the antenna- so, if the antenna is vertical, you’ll have a very shallow takeoff angle, aka groundwave, if its horizontal, the radiation goes vertical. NVIS generally works best between 1.8-8mHz, with the higher frequencies working better during the day and the lower ones at night.

I’ll also add to this that the direction finding threat almost exclusively comes from groundwave. So on HF, NVIS is what you’re looking for. As little groundwave as possible.

So with that said, let’s talk about this antenna.

The first thing to know is that its built out of dirt cheap materials. 128ft 14AWG stranded wire, a Cobra Head, and ten plastic electric fence posts. Less than $25 or so.

For an 80M dipole antenna, each leg is going to be roughly 64ft long. You can make a loop or use a ring terminal to secure the wire to each end of the cobra head. Stretch it out- now you’ve got a dipole. Those plastic fence posts serve both as a suspension for the antenna and as an insulator. All you have to do is wrap the ends in a loop, and boom, you’re ready to rock and roll.

The antenna itself is roughly 2ft off the ground. This creates a high amount of reflectivity from the ground, sending your radiation almost completely vertical.

And with that, you’ve got a dirt cheap antenna that works pretty well. If you want to see how it works and get hands on building one, come out to class.

Brushbeater: Antenna Polarization and COMSEC

NC Scout at Brushbeater has an article on Antenna Polarization and COMSEC (communications security).

So you’re out there on a patrol, the commo window is open and you need to make a Cyril Report back to your TOC. Your RTO sets up the yagi getting ready to make contact, checking and rechecking the azimuth. He glosses back over the transmit and receive frequencies to make sure everything is set, double checking the report to make sure nothing was missed, and getting the approval from you, the Team Leader. You notice one small thing- the Yagi is horizontal, not vertical, and a slow grin grows on your face.

You’ve got a good man on the Team who paid attention.

There’s one element to small unit communications that usually gets zero attention- antenna polarization. Let’s take a look at our most common denominator at the basic level- the Baofeng UV-5R. Its a VHF and UHF FM two-way radio. FM nearly always uses vertical polarization, meaning in simple terms, the antenna is straight up and down.

In a conventional environment we do this for two reasons. First, pretty much everyone else is vertically polarized when communicating via FM, and second, there’s 9db of loss between a vertical polarization and horizontal polarization. Wait, what?

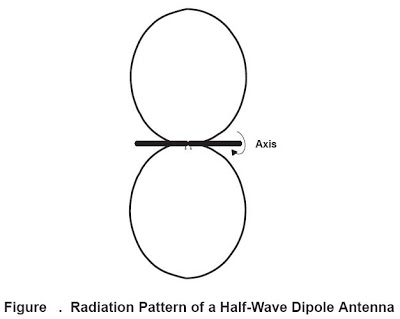
Like how we measure light in Lumens, signal strength radiating from an antenna is measured in decibels (db) of gain or loss. With each 3db of gain, we double our effective radiated power (ERP) in terms of signal strength. With each 3db of loss, we cut our strength in half. This is measured in orders of magnitude, meaning that with each 3db, the strength doubles on itself (4w x 2= 8w x 2= 16w, etc). Taking that into account, the difference in strength between horizontal and vertical polarization is 9db- quite a difference. If someone is using a vertically polarized antenna to attempt to intercept my transmission, they’d likely be using vertical polarization. After all, why wouldn’t you? Nearly all FM transmissions are vertically polarized, its common practice. But if I change my operating practice to account for this, now they’re going to have a harder time both intercepting and getting a bearing on me.

Not impossible, mind you. But much harder. And that’s on top of my other operating practices, such as transmitting on one frequency and receiving on another, keeping my transmissions as short as possible, and making sure I’m always using directional antennas. It goes without saying that your intended receiving station should be matched in polarization. Its a basic practice that, when coupled with my other techniques, turns inexpensive equipment into much more formidable gear for clandestine or unconventional forces operating in the field.

Brushbeater: The Jungle Antenna Revisited

NC Scout at Brushbeater has a new article worth your time if you are into radio communications – The Jungle Antenna Revisited: Task and Purpose for the Partisan and Prepper

Going back to the early days of the Brushbeater blog, the Jungle Antenna post has been and continues to be one of the more popular posts I’ve done. And for good reason- I wrote it to be used. It’s the antenna every student in the RTO course builds and one of the designs they get hands on with, and it’s the one that they know works from the demonstrations we do with them. But often, as with everything, a context for the task and purpose has to be clarified.

Students in the RTO Course preparing an improvised Jungle Antenna for use.

Many preppers who contact me fall into a similar trap. I have an goal and recognize a need. What can I buy that does for me what I want it to do? How do I do this in the most cost-effective way? And finally (but what should be first), how do I obtain the skill to best use the gear I’ve purchased? Its a problematic point of view for a lot of reasons but one I get frequent questions about nonetheless. And that’s ok. I’ll normally answer it the same way- Use your stuff, Learn to use it even better, and never stop!

One of my objectives back then, as it remains in my classes and writing today, was emphasizing the skill of building your own equipment. With communications that’s improvised antennas, because it’s one of the better skills to have. Taking common and cheap components and using them to boost your capabilities is a great talent to have and makes you a force multiplier for your team or group. Those skills have served me very well and for the great people I’ve had in class, it’s went on to help them too. The end goal is getting the most bang-for-buck out of a piece of equipment as possible and with radios, that always means focusing on antennas.

The Jungle Antenna, 292 Antenna, Groundplane, OE-254 or whatever else you wanna call it, are vertical antennas designed to boost range from the relatively inefficient antenna on your radio while using the same power. It does this through efficiency; an antenna has to match, both the ‘hot’ element and the ‘cold’ element (positive and negative, respectively), in order to be resonant. Resonance is another term for an antenna’s electrical match to a particular frequency. And that resonance is measured through wavelengths– with each leg of the Jungle Antenna being one quarter wavelength long. It’s an incredibly simple antenna but it’s one that improves your transmitting and receiving ability- something you definitely want.

Jungle Jim operators in Vietnam getting a commo check before a patrol. Likely packed away in that ruck is a rolled up Jungle Antenna, ready to get strung up.

The Jungle Antenna gets its name from an interesting time in American military history. During the interwar period of the 1920s-30, the Army Signal Corps was experimenting with antenna designs to boost the range of their SCR (Signal Corps Radio, pre-A/N PRC designation in case you’re wondering) in jungle environments. Testing the designs in Panama, they found that if you take a vertical dipole and add two more negative elements, it boosts the radio’s signal in all directions even when the thick vegetation would otherwise absorb the signal. It found its way into use with groups fighting in the island campaigns and in Burma. Even though the crude radios would eventually fail from the humidity and harsh conditions, the antennas worked. Imperial Japan was also experimenting, with two engineers named Yagi and Uda coming up with a directional antenna that still bears their name. Both became very popular designs, with the Jungle Antenna saw extensive use in Vietnam and is still being taught to unconventional warfare RTOs today- because it’s simple, rugged and it works. This history provides us with a bit of context for the antenna and its intended use. It’s an omnidirectional antenna, creating a stronger signal in all directions, optimized for heavy woodland and jungle environments where much of your signal might be lost.

The Jungle Antenna up and running. We’re standing right under it and it disappears- think about how it’ll vanish in just a few more steps.

Why you want an Omnidirectional Antenna?

The Jungle Antenna does two things really, really well. It takes even a small amount of power and squeezes more range out of it, by getting your actual antenna higher, meaning more line of sight, while doing it much more efficiently. It also allows your radio to listen to other traffic much better. Because of it transmits and receives in all directions, this is a great antenna to have up for networking now– and when put up in the trees, the thin wire and natural materials make it virtually disappear. So even if all you’ve got is that $25 Baofeng, you can still get an impressive range out of that 4 watts that the UV-5R puts out. Not too shabby for something you can build out of a split post BNC adapter (the real name for what us Army guys call a Cobra Head), lamp cord and electric fence insulators.

Another, more tactical reason to have an omnidirectional antenna is in a retreat setting where a tactical operations center may have to communicate with multiple patrols simultaneously, and an omnidirectional antenna would increase the range of the radio at the base. I strongly suggest radio operators on a team carry one for their Contingency frequency also. People get lost, routes become compromised, plans change. When those plans change, it’s likely that a team in trouble needs their radio for personnel recovery, with the better range and reception from their Jungle Antenna helping them get found (along with a sound recovery plan).

But the most important reason that transcends all the others is the fact that you’re using something you learned to build yourself. You built it, you learned it works, and now you have that confidence in yourself and your equipment you wouldn’t have any other way. That confidence is earned through training.

Brushbeater: Directional Antennas for the Small Unit, Part II

NC Scout at Brushbeater has Part II of Directional Antennas for the Small Unit.

The use of Directional Antennas are the most basic way to improve communications security even if all you’ve got is a set of inexpensive radios. In Part 1 we talked about the theory of use and why they’re important to have for the dedicated RTO of a small unit. Sending your signal in one direction versus all directions does a couple of things for us- creates security through only sending a signal along the necessary path and second it greatly improves the range along that path. In this section we’re going to discuss the antennas themselves and how they work.

The Yagi

UHF Yagi in the field during the Advanced RTO Course.

Remember just a few years back when every house had those funny antennas on its roof? The ones you had a rotor (or if you were poor you had an set of big channel locks on the pole) to turn to get a better signal on the TV stations you wanted to watch? They’re mostly gone these days but that was a type of Yagi antenna.

Named after two electrical engineers in Imperial Japan during the interwar period, Yagi and Uda, the antenna was a solution to two problems. First, it sent a signal in one direction much further with a lot less power. Second, it listened much stronger in that same direction. It enabled directional communications links with even the very crude radio gear of the day, and found itself in service with the primitive radar systems just coming into use.

Yagis work through having a basic dipole (called the driven element) connected to the radio, with one dipole slightly longer just behind it (called a reflector) and one or more dipoles out front (called directors) that have no electrical connection to the driven element. They work on magnetic harmony- in other words, the reflector reflects the energy from the driven dipole forward, and the directors further pull that energy in the forward direction. The more directors you have, the tighter the beam. In addition, the more directors you have, the higher the decibels of gain you have in that direction- keep in mind that with each 3db of gain, you’ve effectively doubled your radiated power output in that direction. Since gain is in orders of magnitude, for each additional 3db you’re doubling your gain again.

Wait, what? Think about it like this. If you have a three element Yagi antenna, like the one picture above in from the Advanced RTO Course, which has 7.5 decibels of gain, you’ve taken the 4 or 5 watts from a handheld and increased its radiated power to over 20 watts just based on the gain of that antenna, in the direction that antenna is pointed. You’ve taken a very basic tool (the humble handheld) and made a potent communications device while using the same amount of battery power. Not bad. Not bad at all.

But the Yagi also has gain on reception, meaning it hears better in that given direction over a single omnidirectional antenna. That’s why going back to our old over the air TV antenna example above, you’d rotate the antenna towards the direction of the TV station, and why hams use the same antennas on towers to listen in a given direction. Its a heck of a lot of capability in a relatively small package for line of sight (VHF/UHF) use. And since they’re small, they should be part of every patrol loadout.

Moxons

The Moxon is incredibly simple to build.

Similar to the Yagi, a Moxon is a directional antenna that’s wildly simple to build. The best way to describe it is a Yagi with the director removed- a driven element and a reflector. So rather than a tight beam LED flashlight radiation pattern, these are more like a broad maglite. The antenna direction itself is pretty broad compared to the Yagi, but where these really shine is through their simplicity. With just a few pieces of wire and some material for the frame, you can build one in less than an hour and have a directional antenna ready to roll for a team. Check Moxgen for a downloadable program that gives all of the measurements you’ll need for cutting the wires.

Longwire and Resistor

The last directional antenna is known as the Longwire. The Longwire antenna was best known to the Vietnam generation as LRP team members used them for directional communications back to their bases of operations while evading the Signals Intelligence assets of the NVA. As the name would imply, it’s one really long wire that runs to a resistor placed in series with the wire and then driven into the ground. The long wire itself radiates with the ground end running along the earth ground. The resistor works to pull all of the current in its direction and with it most of the radiated energy.

The Longwire antenna rigged up for use. It’s incredibly simple and goes up fast.

Of each of the antennas discussed, the long wire is by far the simplest and most clandestine when used. And it also presents a very low Standing Wave Ratio (SWR) due to the residual energy being pulled to the resistor at the end of the line. Very little gets reflected back to the radio itself, But most of all, it packs up the most compact and is the easiest to build or repair in the field. All you really need is a long run of wire and a high Ohm carbon resistor- just make sure you have a lot of them.

Summing It Up

These three antennas are each fairly easy to build on your own and present a huge advantage over omnidirectional antennas. The security offered through using directional communications is not to be overlooked. For a team of guerrillas communicating critical information, its the only option. But that said it takes a bit of work and training to get right. In part three we’ll be discussing exactly how to do that, covering the basic planning requirements and how to incorporate them into your patrolling equipment.

Here’s a link to Part I if you missed it.

Brushbeater: Directional Antennas for the Small Unit

NC Scout of Brushbeater has an article on Directional Antennas for the Small Unit. Using directional antennas for radio communication can increase the range of communication and decrease signal interception outside the beam path.

One of the biggest misconceptions behind communications security revolves around misunderstanding not just the role of the equipment but also how it functions. A big part of that is the basics of antenna theory. For most radio seems to be a plug and play kinda deal- it either works, or it doesn’t. Antennas are a type of voodoo magic and the solution to security is electronic encryption. Except it isn’t, and doesn’t do anything except mask what you’re saying, but not the fact you’re saying it. Guerrillas must rely on not being detected- and no matter how high tech you think you are, it’ll not solve a tradecraft issue.

The reality is that we’ll be working with equipment that is common and off the shelf- no matter how much we want those microwave NSA-encrypted troposcatter radios made of unobtanium, a big part of local networking is done via plain old VHF and UHF amateur and commercial gear that’s common. Guerrilla communications have to be harder to detect. And at the strategic level when building an underground network, you have to understand how to plan. Even with the cheap equipment most of you likely have, incorporating a level of planning into your local communications will yield a much higher level of security and success. Knowing and understanding directional antennas becomes a key part of that planning, and as we cover in the Advanced RTO Course, there’s several options that each get the job done.

Directional Antennas such as this Yagi seen here offer security by ‘beaming’ our transmission in the direction its pointed.

Directional antennas accomplish two goals for us. First, generally speaking, if you’re not in the direction of the transmission you’re not going to hear the traffic. Because of this it offers a big advantage in the security department. If two directional antennas are transmitting toward one another, they’ll be able to communicate with the only people hearing the full conversation being in the middle of the two people. The second advantage is that instead of all our energy going in all directional at once, as with an omnidirectional antenna, a directional antenna sends the same amount of radiated energy in one direction- greatly increasing our range and signal strength in that direction, so we won’t need nearly as much power to accomplish to reliably communicate over a distance you might not have thought otherwise possible.

Antenna Theory For Non-Technical People

Radio waves travel at the speed of light. So with that said think about your antenna as a type of lightbulb. The more efficient your antenna, the brighter the light (your signal). The more power plus efficiency, the brighter the light and the more range you get. While we measure light in terms of candle power, we’ll measure our signal strength in decibels (db) and our efficiency in terms of gain. Here’s where it gets tricky, but we’ll break it down simple.

A light in the darkness- it the same visual as you would see if an omnidirectional antenna emitted light. That light is a lot like your signal.

Picture yourself in a dark room with no windows. What most people consider antennas could be thought of like lightbulbs in the center of that room. They light it up, but there’s shadowy corners and nothing is as bright as it could be. Where that light goes is just like your signal. And everyone in that room with a set of eyes will immediately know where the lightbulb is. So maybe you don’t want a bright light in the middle of the room, maybe you just want a flashlight to see one corner- to “see” the person you’re trying to communicate with. You’d want a flashlight- and that light directed in one direction will go much further with the same amount of power (or much less) while not lighting up everyone else in the room. That flashlight is a directional antenna.

The antenna you see here is really only half of the picture- the body of the vehicle serves as its groundplane, otherwise known as a reflector. Being in the center of the roof it provides an equal reflection in all directions.

Now let’s explore antenna theory a bit more, now that we have a frame of reference. What most consider an antenna- that thing sticking out of the top of your HT or off the top of your truck, for example, is actually half of an antenna. It is the radiating element- where the signal energy from the radio actually comes out. You could also call this the “hot” side. That radiating element is exactly one half of your antenna. The other half is what’s called the ground plane, which reflects the radiated signal. This would be the “cold” side. So if you’re looking at a flashlight, you’d see the bulb and the mirror behind the bulb. Just as the mirror is a type of reflector, so is that cold side of your antenna. And now the trick is to get that reflector to reflect in the direction we want the signal to go.

Tying the Concepts Together

A directional antenna’s signal would look like this, versus the lightbulb example above.

So just as our flashlight takes a small amount of radiated light and sends it much further than a simple lightbulb in the center of a room would, so does our directional antenna. A lot of folks frequently ask “how much range will this thing get?” when asking about individual radios, and with line of sight gear such as the basic Baofeng, you’re going to get a heck of a lot more in one direction than you would with omni-directional antennas, while greatly improving your own communications security. If you can master the basics while thinking a little bit outside the box, you’ll be surprised at what can be done.


Off Grid Ham: Discussing Vertical And Wire Antennas

Here’s an article from Chris Warren of Off Grid Ham, writing about options for DIY antennas – Discussing Vertical And Wire Antennas

A topic so deep and wide.

I messing around with you. There is no such thing as an antenna specifically for off grid radio. But since off grid amateurs tend to be practical, do-it-yourself types, some vertical and wire antennas are more more appealing than others. What are the options, and how well do they work? We can’t possibly cover everything in one article, but we’ll go over the most popular types of antennas for off grid hams and talk about the function of each of them. vertical and wire antennas

Two basic flavors. vertical and wire antennas

There are two basic types of antennas for off grid radio: Vertical and wire. Yes, I am aware that there are many others: Beams, loops, etc. But remember we’re trying to keep it simple, practical, and relevant. A vast majority of hams end up using either a vertical or a wire antenna.

The reasons why are clear. These antennas are easy and inexpensive to build, and (for the most part) really do work. Think about all the advancements in technology. Radios have gone from massive tube farms to computerized communications centers with color displays and features that would have been Star Trek-ish just ten or twelve years ago! But at the other end of the coax, antennas have not fundamentally changed over the entire history of radio. You can compare a 50 year old ARRL Antenna Book to a 2020 edition and find nearly the same content in each of them. vertical and wire antennas

About the ARRL Antenna Book. vertical and wire antennas

It would be worth your while to own a print copy of the ARRL Antenna Book. It can be very technical and deep, maybe more than what the average ham is willing to digest, but wow, what a wealth of information. When you need to answer an obscure antenna question or look up a way-out-there math equation, the Antenna Book will come through. New copies can be quite expensive. I suggest buying an older used edition for a fraction of the cost. It doesn’t really matter because the information essentially never changes. My personal Antenna Book is nine years old and I have no plans to update it.

I don’t have a real high opinion of ARRL books in general, but the Antenna Book is an exception. It’s stellar. Every ham should own one.

The vertical antenna.

My very first antenna was a vertical, a Hy-Gain 14AVQ to be exact. I bought it used because, well, when you’re fourteen years old cobbling birthday & odd job money together for radio gear, that’s how you roll. The 14AVQ has been in production since at least the 1970s and is still available on the market today. I had a blast with that antenna and made many solid contacts on it. vertical and wire antennas

Vertical antennas offer an omnidirectional signal pattern, take up very little space, and are easy to install. They do not necessarily require support structures such as trees and buildings (I mounted my 14AVQ to a pipe pounded into the ground). Functionally they have a low angle of radiation, which is favorable to DX. There is also some evidence that vertically polarized antennas are better for short range (ground wave) communications.

The cons of vertical antennas. vertical and wire antennas

On the negative side, vertical antennas are harder to home-build and tune compared to wire antennas. Complicating that, commercially made verticals can be expensive. The Hy-Gain 14AVQ of my youth sells new for about $230.00. That’s a lot of money for what is essentially just an aluminum pole with some coils in it. The research & development costs, which I acknowledge can be very high, were amortized off the books decades ago. With that debt long paid off, the 14AVQ represents huge profit center for the manufacturer. This pattern can be repeated for almost any commercially made vertical antenna. Once the R&D costs are recovered, these antennas are basically money presses for the manufacturers.

Lastly, vertical antennas usually require ground radials. Where will you put them? If your antenna is mounted at ground level, you can just bury them in the dirt. Roof mounted verticals may be more tricky. There is no absolute rule for how many ground radials are needed, but more is better.

Wire antennas.

vertical and wire antennas

PUBLIC DOMAIN GRAPHIC

There is little to dislike about wire antennas. They can be easily made from materials most hams already have around the shop. Wire antennas done right really do work! The dipole is the “Mother antenna,” the antenna all others are based on. Wire antennas can be bent and shaped to fit your space. If you have to bend or droop a wire, it’s generally not a problem. Horizontal wire antennas also have a low angle of radiation, but it is dependent on elevation from the ground. This is why amateurs interested primarily in NVIS communications should not mount their wire antennas more than 30-50 feet up. There is such a thing as “too high”.

The bad news.

Wire antennas have two main disadvantages. First, they usually require two or more support structures. For a fixed station, this means having buildings or trees in the right places to hold your antennas up. For portable use, it means picking a site with trees or other tie points, or bringing a support system with you. By the way, many public parks prohibit affixing anything to natural features, even temporarily. Be respectful and verify what you’re allowed to do before you start tossing wire up in the trees.

Although wire antennas can sometimes be bent and shaped to fit a defined space, doing so may affect performance. Antennas are designed to be a certain shape for a reason. Anything that messes with the physics of an antenna is going to change the way it works. Changing the original shape of a wire antenna does not necessarily degrade performance, but it may result in a situation not favorable to your operating needs, such as when the radiation pattern is altered. Many hams have no choice and must do some antenna gymnastics to make their stations work. Although imperfect, these alterations are usually tolerable.

What about store-bought wire antennas?

I generally advise against buying commercially-made wire antennas. They do work well, but with a few exceptions they are not a good value for the money. One well known company is offering a portable “tactical dipole” for $400.00. Granted, it’s very well planned with a slick carry case and other handy features, but in the end it’s still just a dipole. A four-hundred dollar dipole! This illustrates a trend in the prepper/survivalist community where including the word “tactical” in a product name makes that product cost 3-5 times as much as it should.

The “Hail Mary” random wire antenna.

Wire antennas have one more big plus. A “Hail Mary” antenna can be any available length of wire. In more formal language, they’re called random wire antennas and they are exactly what the name implies. In an emergency, you can literally toss a random length of wire out the window, correct it to 50 ohms as best you can with an antenna tuner, and go. It won’t be very efficient, but you will get a signal out.

I have a random wire antenna as part of my go-kit. It works surprisingly well with my 5 watt FT-817. It would never be my first choice, but I’d be very happy to have it as a last choice.

Resources.

QSL.net has this amazing wire antenna reference that lists nearly 400 different wire antennas and diagrams on how to make them. Some of the designs are kind of way out there and I’m not sure they would work, but experimenting is part of the fun. The website cuts out complicated math and lengthy explanations; it just gives short & simple recipes on how to make some great antennas.

WA2OOO has a very cool calculator to determine the size of several popular wire antennas.

AmPart: RTO’s Guide to Connectors

NC Scout at American Partisan has a nice, short article on radio cable/antenna connectors and what is useful for improvising antennas — RTO’s Guide to Connectors.

One of the common questions I get before, during and after the RTO Course is “how in the heck do you remember all those different connectors?” Well, the answer is nothing more than repetition- I know them because I’m built so many antennas over the years and needed the various connectors you come to know what they’re called.

Its a good idea to have a large number of spare connectors and adapters on hand. If you’re making external antennas for your equipment, they’re an absolute must have item. And unlike pretty much everything else we make our antennas from in the RTO Course, they’re the hardest to source in a working environment, so knowing what they are and having a bunch on hand now makes too much sense.

Cobra Heads make improvised antennas fast and simple.

The Cobra Head 

A story I tell in class is exactly how I discovered the real name for what I always knew as a Cobra Head. The Split Post BNC Adapter, or BNC Banana Jack Adapter, is widely known to Army guys as Cobra Heads- in fact, I never knew they were called anything else and couldn’t find them for a long time after I got out. I found them at a Hamfest in a big tray of connectors and felt like an idiot when I was told what they’re really called. It didn’t matter- I found them.

Why they’re important is that its the easiest connector to use when building improvised wire antennas. We were given them by the bagful in the Army to practice antenna building, and I came to really appreciate it. Simply cut your wire, match the radiating wire to the red end and ground side to the black, loop it around and you’re good to go. If you want to get the most secure with it be sure to use some ring terminals to connect the wire to the connector. Attaching BNC coax can’t be easier and more secure…

Click here to read the entire article at American Partisan.

American Partisan: Home Brew – NVIS Antenna

Johny Mac at American Partisan has an article up at American Partisan on making your own NVIS antenna. A near-vertical incidence skywave (NVIS) antenna is used in the high frequency (HF) spectrum from around 1.8MHz to  10MHz in order to cover an approximate radius/range of 300 miles. HF is usually used for long distance communication around the world, and most antennas are built to maximize range, but those antennas can often cause the radio signal to skip or make a gap in the range from about fifty to three hundred miles.  The NVIS antenna redirects the radio signal in such a way that it covers that gap at the sacrifice of the longer distance contacts. This makes the NVIS antenna ideal for communications during a regional disaster.

If you do not know what a NVIS antenna is and why it is a great addition to your antenna farm, go and read these four articles. The first being from NC Scout titled, Near Vertical Incidence Skywave – Simplified, then NVIS I, NVIS II, and NVIS III authored by Key Pounder and published on NC Scout’s site, Brushbeater.

At a 100,000-foot level though, a NVIS antenna is a dipole antenna that has a steeper transmit angle than a traditional horizontal flat-top dipole antenna and is located closer to the ground at between 8 to 15-feet Vs. a traditional 1/4λ height; let’s say 30 to 60-feet over tera firma. This allows you to transmit to other stations closer to your AO that you may skip over using a flat-top horizontal dipole antenna. Think of the skip bounced off the ‘F’ layer of the ionosphere being 25 to 50-miles Vs. 200 to 300-miles. The German Army developed this procedure during WW II to communicate with troops via the airwaves closer to the transmitting station.

Traditional dipole antenna radiation Vs. NVIS radiation

I started out building my NVIS antenna using the directions posted on the DX Engineeringsite as my blue-prints for the project. Although you can buy a kit from DX Engineering, I had plenty of hardware around the redoubt so I decided to save a few bucks. Below is my Mise en place for this build. Hams are the true scroungers of this earth…

Click here to read the entire article at American Partisan.

AmPart: Directional Antennas for the Small Unit, Part I and II

NC Scout at American Partisan has started a series of articles on antenna theory called Directional Antennas for the Small Unit. If you’re just getting started in radio communication, or you’ve been using it for a while but haven’t spent much time getting to know your antennas, this is a good start.

Directional Antennas For The Small Unit, Part 1

One of the biggest misconceptions behind communications security revolves around misunderstanding not just the role of the equipment but also how it functions. A big part of that is the basics of antenna theory. For most radio seems to be a plug and play kinda deal- it either works, or it doesn’t. Antennas are a type of voodoo magic and the solution to security is electronic encryption. Except it isn’t, and doesn’t do anything except mask what you’re saying, but not the fact you’re saying it. Guerrillas must rely on not being detected- and no matter how high tech you think you are, it’ll not solve a tradecraft issue.

The reality is that we’ll be working with equipment that is common and off the shelf- no matter how much we want those microwave NSA-encrypted troposcatter radios made of unobtanium, a big part of local networking is done via plain old VHF and UHF amateur and commercial gear that’s common. Guerrilla communications have to be harder to detect. And at the strategic level when building an underground network, you have to understand how to plan. Even with the cheap equipment most of you likely have, incorporating a level of planning into your local communications will yield a much higher level of security and success. Knowing and understanding directional antennas becomes a key part of that planning, and as we cover in the Advanced RTO Course, there’s several options that each get the job done.

Directional Antennas such as this Yagi seen here offer security by ‘beaming’ our transmission in the direction its pointed.

Directional antennas accomplish two goals for us. First, generally speaking, if you’re not in the direction of the transmission you’re not going to hear the traffic. Because of this it offers a big advantage in the security department. If two directional antennas are transmitting toward one another, they’ll be able to communicate with the only people hearing the full conversation being in the middle of the two people. The second advantage is that instead of all our energy going in all directional at once, as with an omnidirectional antenna, a directional antenna sends the same amount of radiated energy in one direction- greatly increasing our range and signal strength in that direction, so we won’t need nearly as much power to accomplish to reliably communicate over a distance you might not have thought otherwise possible…


Click here to read the entire article at American Partisan.

Click here to read Part II at American Partisan.

American Partisan: The Jungle Antenna Revisted

NC Scout at American Partisan has written another article discussing the jungle antenna – The Jungle Antenna Revisited: Task and Purpose for the Partisan and Prepper. NC Scout has written about this antenna and its usefulness previously.

Going back to the early days of the Brushbeater blog, the Jungle Antenna post has been and continues to be one of the more popular posts I’ve done. And for good reason- I wrote it to be used. It’s the antenna every student in the RTO course builds and one of the designs they get hands on with, and it’s the one that they know works from the demonstrations we do with them. But often, as with everything, a context for the task and purpose has to be clarified.

Many preppers who contact me fall into a similar trap. I have a goal and recognize a need. What can I buy that does for me what I want it to do? How do I do this in the most cost-effective way? And finally (but what should be first) how do I obtain the skill to best use the gear I’ve purchased? It’s a problematic point of view for a lot of reasons but one I get frequenct questions about nonetheless. And that’s ok. I’ll normally answer it the same way- Use your stuff. Learn to use it even better, and never stop!

One of my objectives bak then, as it remains in my classes and writing today, was emphasizing the skill of building your own equipment…

Click here to read the entire article at American Partisan.

Brushbeater RTO Course – Why You Should Take It

One of our members recently attended the Brushbeater RTO Course. He has written up his thoughts on why you should take the RadioTelephone Operator course if you can.

Earlier this month I attended Brushbeater’s RadioTelephone Operators course taught by NC Scout. Other people have done reviews of the class (see here and here), so I am going to structure this a little differently. Rather than give a blow by blow of the course as others have already done, I’ll try tell you why you, as a prepper, or member of a Neighborhood Protection Team (NPT), or member of a Mutual Assistance Group (MAG), should take this course.

The purpose of the RTO course is to teach you how to communicate via radio and do so effectively as a member of a communications team. Communication is the act of transferring information from one place to another. Successful communications means that the information has been correctly and effectively transferred from the sender to the receiver. How many ways can that go wrong in radio communication? You may be surprised. The RTO class attempts to identify and rectify some of those common problems.

First, you may not be talking to the right person in the right place. For this, you need a communication plan, or Signals Operating Instructions (SOI). The plan tells you how to identify/authenticate to whom you are talking. It tells you where (what frequency) to contact them. If you can’t speak to them on that first, primary frequency, then you have an alternate frequency and then a third, contingency frequency. Finally, the plan lays out an emergency method of communication. You may have one plan that you use week in and week out for practice with your team or for supporting public service events, but you should practice changing it as well. And if you are preparing for some sort of TEOTWAWKI SHTF WROL WTFBBQ where your NPT is fighting off the golden horde type of event, you’ll want to change it every day.

Choosing the correct frequencies for the location and distance across which you need to make contact is a part of this planning, too. Will line-of-sight frequencies be appropriate or are beyond-line-of-sight frequencies required? What frequencies do everyone’s radios cover? To what frequencies does any possible adversary have access? If our radios cover a frequency, is the antenna on the radio sufficient to make the contact? If not, can you build a field expedient antenna that will be better?

Make sure you can talk to the person you want, and that it actually is the person you expect – check.

Next, you need to transfer all of the information without forgetting or leaving out anything important. Here the RTO course emphasizes standardized report formats. Most of these have come from NC Scout’s prior military experience. You can modify these for your own group or make up new ones; the important thing is to standardize them and to not modify them to leave out anything important. Many experienced radio operators or prior-military service personnel are familiar with the SALUTE report (size, activity, location, uniform, time, equipment) for reporting enemy information, but there are many other useful reports as well.

A good example is the arrival report, used to tell the command element that you have arrived at the location where you were sent. In my own experience with public service and emergency response, your arrival is typically only sent with something like, “Net control, this is Wxxxx. I have arrived at Spokane Memorial.” While having an entire report for arrival, may take more air time, it can convey critical information. For example, you can add that there was a rollover accident blocking interstate 90 so take the 5th Ave exit to get to the hospital. Or you were sent to the Red Cross building on McClellan, but they had moved services a few blocks away to the high school at 5th and Stevens and you taking up your post there. Deviations in final position as well as deviations on your route the location can provide important information for higher up decision makers and shouldn’t be left out.

The RTO course covered and practiced sending and receiving several different types of eports. Just as important as sending all of the information is receiving all of the information accurately. NC Scout emphasized that the receiver should repeat back the entirety of the report to the sender to ensure accuracy. Just saying, “Report received” doesn’t cut it and results in time wasted, or worse — lives lost, because a response was sent to the wrong location or the wrong assets were delivered.

Make sure that all important information is accurately delivered – check.

Finally, if your group or team is going to run efficiently and effectively, your command and control must be organized. Units being sent out must know why they are being sent and what they are expected to accomplish. The command element/post must remain available and actively monitor any operations in progress. Enough radio operators must remain with the command element to communicate with all of the remote units without being overwhelmed. How many radio operators that is will depend on your specific circumstances, including your size, the number of remote units to be sent out, the type and size of the situation to which you are responding, the capabilities of the radio operators and so on. For example, a command center for a peacetime parade may have one radio operator, communicating with twelve remote radio operators, but a large marathon may have several different teams operating on their own frequencies with their own net control. Similarly, a Neighborhood Protection Team with one control point and one roving patrol can operate with one RTO in the command center, whereas a community under siege in a civil disturbance scenario may have several scouting teams out and a need for a command center RTO for each remote team.

The RTO course again uses some military procedures to help with the command function. Warning orders and operations orders are briefly discussed as methods to impart the goals and mission-specific procedures to the teams being sent out. Similarly, NC Scout briefly discusses what are intelligence and intelligence requirements and the inclusion on the requirements in mission briefings.

Control your communication teams effectively – check.

The RTO course teaches to all levels of experience. If you are new to radio communications, the class will cover the basics of radio operation, antenna theory, and propagation for line of sight and beyond line of sight communications at a level that is understandable for a beginner, yet provides insights to more experienced radio operators as well. The class I was in had people from no prior radio use at all the way up Amateur Extra ham radio operators and ex-military radio users. Everyone appeared to have gained something valuable from the class.

In a disaster or SHTF scenario, you will need to talk to someone. That someone likely won’t be standing right next to you all of the time. How are you going to talk to them when they aren’t in talking distance? Why might you use UHF instead of VHF to talk to them? Why might you need HF? Why might you want to use a digital mode instead of FM or SSB? What’s the best radio for my team? Who needs to have a radio? Who needs to know how to use one? Should you use FRS or MURS? Should you get an amateur radio license? Is burying a box of Baofengs enough to cover my communications needs in the future? If you’re not sure about the answers to any of those questions, or are confused about what some of them mean, then you should take this class.

Occasionally I teach classes for people to get their Technician amateur radio license, and I plan on using some of NC Scout’s antenna explanations in the next class. The training about reports has made me re-evaluate how our radio communications should be conducted. I drove seven hours for the class, and it was worth it.

Related:

Brushbeater: Scenes from a Recent RTO Course

Dialtone: Puzzle Pieces – Gear to have in your kit for field expedient antennas.

Covert and Hidden Antennas

Sparks31 has a brief article up on Covert and Hidden Antennas.

Whether you are setting up a field radio station for communications or a monitoring post for SIGINT operation, the antenna is the linchpin of your setup. The best radio in the world is useless without a decent antenna.

Let’s take a look at a common antenna design, one I’ve used with much success over the years:

discone-vhf-uhf-hardline

This is a discone antenna. I have one at my eastern QTH. For a first antenna it’s not bad. It makes an adequate wideband receive and transmit antenna for the VHF and UHF bands. It’s a unity gain antenna, but its advantage is that you can get on the air with multiple VHF and UHF bands with a single antenna. For permissive urban and suburban environments it’s a good choice.

However, it sticks out like a cow in church. Anyone with a modicum of RF knowledge will know what you’re doing when they see one on your roof. Not a problem in permissive environments like the U.S. today, unless you live in place that has a H.O.A. which restricts antennas, or for whatever reason(s) you want to keep your RF activity under wraps.

Antennas are one of those things that you can easily roll your own out of whatever stuff you have lying around your workshop, homestead, or wherever.

Marconi spins in his grave every time a ham buys an aerial instead of building it.
– Joe W1GFH

Continue reading “Covert and Hidden Antennas”