Practical Self Reliance: Cooking with Animal Fat

Ashley Adamant at Practical Self Reliance has a good article up on Cooking with Animal Fat. In some sort of long term disaster scenario, it will be easier for most people to procure animal fats than vegetable fats. Lard, as one example of animal fat, is shelf stable for four to six months at room temperature, which also happens to be the same amount of time that it took for pioneers to travel the Oregon Trail. A family of four on the Oregon Trail would take around two hundred pounds of lard with them for the journey. An excerpt from the Practical Self Reliance article is below:

Animal fats can be a healthy part of any diet, especially from a grass-fed and pasture-raised animal.  Learning to cook with lard, tallow, and schmaltz is easier and healthier than you might think.

Whether you’re rendering fat from scratch or buying good quality animal fat, there’s never been a better time to reintroduce this classic kitchen staple back into your culinary repertoire.

Animal fats have been through a lot in the last 30 years. Once a staple in kitchens across the country, lard and tallow were largely eliminated from American cuisine in the early 90s when fat-free diets became popular.

At the time, margarine and vegetable shortening became the new popular kids on the block — it was down with natural fats and in with super-processed, high-in-trans-fat alternatives! 

We now know that those synthetic, processed trans fats have nasty health consequences, and studies are now confirming the wisdom of a traditional diet with plenty of natural animal fats. (And grass-fed bone broth too!)

Now the pendulum seems to be swinging in the opposite direction and animal fats are making a resurgence. Maybe you’ve noticed the appearance of duck fat-fried potatoes on your local bistro menu or you’ve made an astonishingly perfect pie crust using lard instead of shortening.

Or perhaps you’ve read about the health benefits of using animal fats, many of which are rich sources of vitamin D and omega-3 fatty acids. Whatever your reason for wanting to introduce more animal fats into your diet, there are plenty of reasons and resources to get you started. 

BENEFITS OF ANIMAL FATS

Animal fats have been vilified for so long that it’s refreshing to see a resurgence in public interest around the once-taboo ingredient’s many health and culinary benefits. Both lard and tallow are high in vitamin D and omega 3 fatty acids and lack any of the trans fats which are prevalent in commercially prepared vegetable shortenings. 

Depending on the recipe, food that has been prepared using animal fats tends to be crispier, flakier, and ultra-flavorful. If the fat is prepared properly before rendering, that is, all the meat has been removed, it should be fairly flavorless and odorless.

Instead of introducing a “gamey” flavor, the rendered fat should work to enhance the natural flavors of the remaining ingredients.

Readily available animal fat is an added bonus of the tip-to-tail lifestyle, it would be incredibly wasteful to dispose of fat instead of finding a use for it — whether that’s in the kitchen or elsewhere.

Even small animals like squirrels are a potentially good source of animal fat, I’ve found it largely comes down to trial and error in terms of which fats are best for cooking with. 

TYPES OF ANIMAL FATS

The world of animal fats is vast and varied, with many different factors contributing to taste, texture, and usage.

The type of animal is top of the list, but other factors include where on the animal’s body it’s harvested from, how and what the animal is fed, and the season it’s harvested…(continues at PSR)

Bushcraft Northwest: Wild Foods/Wilderness Cooking Class, Apr. 23-24, 2022

Bushcraft Northwest Wild Foods and Wilderness Cooking workshop

Bushcraft Northwest in Goldendale, WA is holding a Wild Foods and Wilderness Cooking class on the weekend of April 23 & 24, 2022. The cost is $275.

Most wild food classes focus solely on edible plants. While this is undeniably important knowledge to posses, the availability of plants and berries is highly dependent upon both the time of the year and location. Our course goes in a different direction and combines both traditional and modern knowledge to help you eat better and carry less. In this two day workshop, we cover how to make great foods while backpacking, catch fish and wild game, make simple and effective traps and snares, utilize primitive cooking techniques, net making, drying racks, breads, bannock, how to pack and organize, great recipes, and much more. There is no prerequisite for this course, but it is very knife intensive. Knife techniques are also taught as part of the course and a folding saw is highly recommended as well.

All food and meals are provided, but you may bring whatever snacks and drinks you’d like as well. Please bring the camping items necessary for your comfort during the workshop. All of the items on our website are available to try and purchase during the weekend.

Bushcraft Northwest also offers private workshops for individuals, groups, and government agencies. Cost varies depending on group size and whether the course will be held at our location in Goldendale, WA or if we are traveling to your location. Please contact us via email or feel free to call  (360) 606-1036 to find out more information.

TOPICS TAUGHT DURING THE WORKSHOP INCLUDE:

Traditional Cooking: You don’t need pots and pans to cook and preserve food. Methods covered include hot rock cooking, dutch ovens, baking, and drying meat.

Fishing: How to make nets, weirs, and fishing tackle out of a blend of modern and natural materials.

Trapping: Primitive snares and deadfalls are illegal unless there is a true emergency. Learn the most efficient methods should the need arise.

Edible Plants: Plants are an easy and reliable food source once the edible varieties can be positively identified.

Knife techniques: Learn proper cutting techniques which are both safe and efficient. Hands on training with lots of carving.

Bushcraft Northwest Wild Foods and Wilderness Cooking workshop

Jamie Cooks It Up: Food Storage and Recipes

40 Food Storage Recipes and Food Storage/Pantry Staple Lists is an older blog post from Jamie Cooks It Up! It talks about what kinds of foods to have as staples and for long term storage, and then links to a bunch of storage recipes (also on her site) for using those foods. Maybe you bought up a bunch of food storage early in this pandemic and aren’t sure what to do now. Maybe you’re looking at the supply chain woes and wondering what you need to get through the rest of year. Jamie Cooks It Up also posts a “week menu plan” each week with one meal per day for the week.

I’ve been getting a lot of emails lately regarding food storage, and pantry staples. 

“What do you keep stocked in your kitchen, what are some fabulous food storage recipes, Where should I buy my food storage and What can I feed my family if I can’t go to the store for 3 weeks in a row”. These are just a sampling of the questions posed.  

Now, I am by no means a food storage specialist, however I thought I would put together a few tips, lists and recipes together for you regarding the subject. Please know that the advice I am giving here is just from my own personal experiences, and not the only tried and true method around. If you have some food storage advice, I would love you to leave it in the comment section for others to view. 

Acquiring a substantial food storage can be overwhelming, I realize. The intention of this post is not to cause you stress or grief or feelings of extreme anxiety. When I was newly married, some 18 years ago, I remember coming across an article in a magazine that had to do with organizing a kitchen and what spices a person should  purchase. After taking one glance at the list I tossed it in the trash and thought to myself…”there is no way I’ll EVER be able to acquire all of those things, I wonder how long we can live on cupboard lint.”

It’s true. Those were my very thoughts. 

However, I learned as I’m sure many of you have, that it just takes a little bit of time, effort and financial planning and a well stocked kitchen can be attained. The same is true of obtaining a useful supply of food storage. You don’t need to spend 1 million dollars or build an underground bunker storing 95 years worth of food to be successful. 

Alright, let’s get to it. If you are already a food storage pro, and are just looking for the 40 Food Storage Recipes promised, please scroll to the bottom of the post and enjoy. 

WHY IN THE WIDE WORLD SHOULD I STORE EXTRA FOOD?

As a means of being prepared for difficult circumstances, such as job loss, natural disasters or an economic downturn. 


WHAT KIND OF FOOD SHOULD I STORE? 

You should store food that your family regularly eats, that also has at least a 3 month shelf or freezer life. Baking supplies, spices and seasonings, canned goods, as well as frozen vegetables, fruits, meat and poultry. (Lists found if you keep scrolling down.)

Expensive Freeze Dried Food is not really my cup of tea. I may regret not purchasing it if the continents end up colliding and I am forced to dig a hole in my back yard and eat tree roots to survive. Truly. I may regret it at that point. But for now, stocking and storing a 6 month to 1 year supply of real food my family regularly eats is my course of action. 

Store some long term food storage items such as hard winter wheat, rice, dried beans, etc. I try to keep about a 3 year supply of these things. (Keep scrolling down for a complete list). They are inexpensive, healthy and if stored properly they have a 30 year shelf life! That is a long old time, wouldn’t you agree? I keep these items in large, sealed, 5 gallon buckets (they can accommodate about 40 pounds). I don’t have a big food storage room so I just stick them here and there, which really means my kids all have 3 or 4 buckets in the bottom of their closets. But they don’t mind, they would rather eat rice and beans than tree roots…or so I keep telling them…

LONG TERM STORAGE:

*Hard White Winter Wheat
Dried White Beans
Dried Black Beans
Dried Kidney Beans
Lentils
* White Rice
Brown Rice
*Steel Cut Oats

40 FOOD STORAGE RECIPES
The recipes I have listed for you below, are recipes that primarily use food storage staples as ingredients. You may need a fresh egg, some milk, butter or cheese for some of them, but I tried to keep the list as food storage friendly as I could…
Moogie Mush, cracked wheat cereal

Total Time: 17 minutes

Yield: 8 servings

Ingredients

4 C hot water
1/4 t salt
1 1/2 t vanilla
3/4-1 C raisins
2 1/2 C cracked wheat (I buy White Winter Wheat and then crack it in a blender)
1/4 C brown sugar
20 packets of splenda

Instructions

1. Crack your wheat in a blender. Don’t add more than about 2 cups at a time. It should be the right texture after about 4 minutes.
2. Combine the water, salt, vanilla and raisins in a sauce pan and bring to a boil.
3. Turn down the heat to low and stir in the wheat. The wheat tends to clump up a bit. Break the clumps up with a wooden spoon.
4. Add the sugar and splenda and stir to incorporate.
5. Cover the sauce pan, turn off the heat, and let it sit for 10 minutes. (Keep it on the warm burner)

Organic Prepper: 11 Delicious Ways to Use Dry Beans from Your Storage

A week ago, we posted an article on cooking the dry beans from your food storage. Here’s one from The Organic Prepper that has recipes for using those beans in ways you may not have thought previously – 11 Delicious Ways to Use Those Dry Beans You Stockpiled. The author, Diane Vukovic, is also the author of the book Disaster Preparedness for Women.

Dry beans are one of the best disaster foods to stockpile. They are nutritious, cheap, and last for years when stored properly. But then disaster strikes and you suddenly have to figure out how you are going to use all of those beans. Eating rice and beans gets boring quickly!

I’m lucky because my family already eats beans almost daily. So, when COVID-19 struct and we tapped into our food stockpiles, our diet didn’t change much. Here are some of the bean recipes my family is eating now. Even my kids like most of these.

Tip: When building up your disaster food stockpile, think about how you will use the foods in meals. Otherwise, you could end up with a lot of foods you don’t like. Or you might end up with disproportionate amounts of food, like 30lbs of pasta but not sauce to go on it.

In my book Disaster Preparedness for Women, I show exactly how to plan a food stockpile so you can make healthy, balanced meals. The book also covers all the preparedness essentials so you are ready for anything. Get the book here.

Here are 11 tasty ways to use dried beans

Try these delicious dried bean recipes.

1. Red Bean Pasta Sauce

This disaster recipe couldn’t be easier. Just blend (or mash) 1 cup of cooked pinto beans with 1 cup of tomato sauce to make 4 generous servings. Add seasonings like salt, basil, and oregano to taste. Serve over pasta.

2. Chickpea Nuggets

Of all the beans, chickpeas are the most kid-friendly. They also don’t have as much water as other beans, so are easier to form into burgers, balls, or nuggets. I like this recipe which uses oats to hold the nuggets together. If you don’t have breadcrumbs or cornflakes you can just use more blended oats for the coating. You can also omit the nutritional yeast.

3. White Bean and Olive Oil “Alfredo” Sauce

Here’s another easy bean sauce for pasta. Just blend (or mash) 1 cup of cooked white beans and ¼ cup of olive oil or butter to make the base. Add salt, pepper, garlic powder, onion powder, parmesan, and a splash of lemon juice to make a delicious creamy sauce for pasta.

*You can also sneak this sauce into mac n’ cheese so your kids get more protein without even realizing it.

4. Lentil Bread

Whenever I make bread, I sneak in some extra nutrition. How? I add things like blended kale, pulverized dried mushrooms, or bean puree. The bread comes out great and my kids eat it up.

To make, remove about ½ cup of water from your bread recipe and replace it with ½ cup of bean puree. If the dough ends up being too wet, add more flour…

5. Bean Burgers and Sausages

Beans and lentils can easily be turned into burgers or sausages. All you need to do is:

  • Make sure the beans are drained very well or the burgers will fall apart. Lentils are particularly wet so I’ll squeeze them by hand to remove the water.
  •  Pulse in a food processor with some cooked veggies and seasonings. If you have egg, add an egg to the mixture.*
  • Add oats, breadcrumbs, or flour (oats and breadcrumbs work best because they absorb moisture and hold the burgers together well). Keep adding until you form a mixture that sticks together.
  • Form into burger or sausage shapes. Bake or fry.

*Egg acts like glue to hold the burgers together. If you don’t have egg, you can usually just omit the egg and the recipe will still work. Another option is to use flax or chia seeds instead of egg. These become a bit like glue when wet and do a good job of holding burgers together. I’ve got a massive stockpile of flax at home specifically for this purpose!

6. Black Bean Brownies

I know this one probably sounds weird, but you can’t taste the black beans the brownies at all. It ends up being a protein-packed treat and your kids don’t even realize they are eating beans. I like this recipe which is simple to make with disaster staples…(continues)

Click here to read the entire article at The Organic Prepper.

Hello Homestead: Cooking with Dried Beans

Sam Schipani at Hello Homestead has an article that explains how you should prepare your dried beans, storage, soaking, cooking – Here’s what you need to know about cooking with dried beans. If you are seasoned at using your storage foods, then there may be nothing new here, but if this is your first time pulling out that food that you got “just in case” or recently picked up some dried beans as desperately sought out foods for lockdown, then this is for you.

Red kidney beans. | Photo from Pexels

As the number of positive coronavirus cases continues to climb, citizens around the country have started stockpiling foodstuffs in preparation for the recommended social distancing, self-quarantine and self-isolation. A few nonperishables, in particular, have been popular in grocery stores — among them, canned beans.

Luckily, dried beans are generally available in bulk supply, in both conventional grocery stores and health food stores. If you purchased a bag of dried beans to stand-in for your usual canned counterparts, you may not know what to do with them.

Consider this an opportunity to open yourself up to the wonderful world of dried beans. Dried beans are cheaper, healthier and more sustainable than their canned counterparts. Plus, dried beans usually come in much more fun and tasty heirloom varieties than the canned offerings.

To make tasty, tender beans while avoiding any uncomfortable gas, here’s what you need to know about preparing dried beans from scratch.

Stored dried beans at Songbird Farm in Unity, Maine. | Photo by Linda Coan O’Kresik

1. Store them

First, make sure you properly store your dried beans leading up to the moment you use them. Dried beans left in their original grocery store packaging — generally, a thin plastic or paper bag — will dry out faster. Instead, store them in food-safe storage containers with a tight-fitting lid. Dried beans should also be stored out of direct sunlight in a dry spot kept at a cool temperature between 50 and 70 degrees Fahrenheit. A cool pantry will work best.

2. Soak them …

Many dried beans need to be soaked before they are used to dissolve the starches that cause intestinal discomfort. The exceptions to the bean soaking rule include smaller and softer legumes, such as lentils, split peas, black-eyed peas and adzuki beans.

For all beans, pick through the beans and discard any discolored or shriveled beans, as well as any foreign matter such as stray pebbles or twigs. Rinse the beans well.

To soak, put the dried beans in a pot and cover them in a few inches of water. Let sit overnight in the refrigerator.

If you don’t have all night, you can also quick soak beans and get a similar effect. Put those beans in a pot, cover them with water and bring them up to a boil. Let the beans boil for a few minutes, then cover the pot and turn off the heat. Let the beans sit for at least half an hour in the hot water.

… or, maybe, don’t soak them

There are kitchen gadgets that can help you get around the soaking if you really want to. You could make your beans in a slow cooker in just a few hours without soaking overnight, or you could prepare dried beans in a pressure cooker (but don’t skip the olive oil — this helps reduce foam during cooking, which could clog the pressure valve).

The exception to these workarounds, though, is red kidney beans, which should always be soaked. They require a different cooking method to break down toxins in the bean. To make them more digestible, always soak first and then boil for 20 minutes before preparing in the slow cooker or pressure cooker.

3. Cook them

If you have chosen to use the regular soaking method, now it’s time to make those beans nice and creamy. First, drain and rinse your soaked beans, whatever method you wound up using.

Transfer them to another pot, then cover them in a few inches of water (the exact amount isn’t important). Bring them to a simmer, avoiding a boil (which will make them fall apart), with a dash of salt.

You may have heard that dried beans shouldn’t be salted until the end of cooking to avoid toughening the beans, but this is an oversimplification of the truth. In fact, some chefs swear that salting beans at the beginning of cooking and ending up with flavorful, tender beans. As a general rule, keep early salting light — most of the salt will be added at the end, after the beans have cooked through.

To give your beans a little more flavor, add aromatics such as onions, shallots, garlic, chiles or fresh herbs. The Bean Institute recommends a whole, quartered onion, a few cloves of garlic, and a sprig or two of fresh herbs like rosemary, thyme or a bay leaf, but you can experiment with your own mix of flavors. Lightly salt again after about an hour of simmering.

After another 30 minutes to an hour, your beans will be tender and edible (a quick taste test will help to make sure, but be careful not to burn your tongue). Turn off the heat and fish out any aromatics you used (keeping them in a cheesecloth bag is one easy way to do this). Then, season the cooking liquid to taste with salt and add any acidic ingredients such as tomatoes, vinegar or lemon juice… (continues)

Read the entire article at Hello Homestead by clicking here.

AmPart: Community Cooking – More Practical Approach to Prepping

NC Scout at American Partisan has an article up about the southern tradition of Community Cooking, how it aids a community, and how communal cooking may help in a disaster.

So we’re finding ourselves in a rush once more. The reality of a pandemic is setting in and people are buying up as much freeze-dried supplies as they can get their hands on. But while I don’t think the physical consequences for an overwhelmingly large percentage of healthy persons will be severe, I do think that the economic disruptions, and the trickle down interruptions in our food supplies, have the potential to be far-reaching. Then again its one of the very real reasons that a good number of people I’m friends and neighbors with have taken every opportunity to move towards a more sustainable lifestyle. Its not just about having solar power or ‘living off the grid’ for my own sake, but a creation of better resiliency against these sort of inevitable disasters. So you’ve got all those beans and rice put back, but how are you gonna cook them? And are you cooking off-grid? I draw on lessons I learned from my childhood growing up in the rural south and as an adult living in the third world, among Iraqis and Afghans, where a supply chain wasn’t taken for granted. Top among those lessons was the value of cooking for a whole community.

<img aria-describedby=”caption-attachment-9661″ class=”wp-image-9661 size-medium” src=”https://i1.wp.com/www.americanpartisan.org/wp-content/uploads/2020/03/100_1245.jpg?resize=300%2C200&ssl=1″ alt=”” width=”300″ height=”200″ srcset=”https://i2.wp.com/www.americanpartisan.org/wp-content/uploads/2020/03/100_1245-scaled.jpg?resize=300%2C200&ssl=1 300w, https://i2.wp.com/www.americanpartisan.org/wp-content/uploads/2020/03/100_1245-scaled.jpg?resize=1024%2C682&ssl=1 1024w, https://i2.wp.com/www.americanpartisan.org/wp-content/uploads/2020/03/100_1245-scaled.jpg?resize=768%2C512&ssl=1 768w, https://i2.wp.com/www.americanpartisan.org/wp-content/uploads/2020/03/100_1245-scaled.jpg?resize=1536%2C1024&ssl=1 1536w, https://i2.wp.com/www.americanpartisan.org/wp-content/uploads/2020/03/100_1245-scaled.jpg?resize=2048%2C1365&ssl=1 2048w, https://i2.wp.com/www.americanpartisan.org/wp-content/uploads/2020/03/100_1245-scaled.jpg?resize=610%2C407&ssl=1 610w, https://i2.wp.com/www.americanpartisan.org/wp-content/uploads/2020/03/100_1245-scaled.jpg?resize=1080%2C720&ssl=1 1080w, https://i2.wp.com/www.americanpartisan.org/wp-content/uploads/2020/03/100_1245-scaled.jpg?resize=1320%2C880&ssl=1 1320w, https://i2.wp.com/www.americanpartisan.org/wp-content/uploads/2020/03/100_1245-scaled.jpg?w=2160&ssl=1 2160w” sizes=”(max-width: 300px) 100vw, 300px” data-recalc-dims=”1″ />

Discada- a giant steel disk that people have been effectively cooking on for over a millennia.

In America we’re culturally predisposed to thinking individually, permeating all the way down to our eating habits. This has led to incredible amounts of wasteful practices, but its also led to us isolating ourselves to a large degree. In many respects this filters down to our own preparedness practices; the things we buy, the things we buy in bulk, and the justifications behind them. It is an attitude of “I GOT MINE!” negating the reality that hungry masses are motivated masses- and they’ll simply take what you have when they get desperate enough.

On the other hand, a community protects what a community values.

<img aria-describedby=”caption-attachment-9610″ class=”wp-image-9610 size-medium” src=”https://i1.wp.com/www.americanpartisan.org/wp-content/uploads/2020/02/100_1165.jpg?resize=300%2C200&ssl=1″ alt=”” width=”300″ height=”200″ srcset=”https://i0.wp.com/www.americanpartisan.org/wp-content/uploads/2020/02/100_1165-scaled.jpg?resize=300%2C200&ssl=1 300w, https://i0.wp.com/www.americanpartisan.org/wp-content/uploads/2020/02/100_1165-scaled.jpg?resize=1024%2C682&ssl=1 1024w, https://i0.wp.com/www.americanpartisan.org/wp-content/uploads/2020/02/100_1165-scaled.jpg?resize=768%2C512&ssl=1 768w, https://i0.wp.com/www.americanpartisan.org/wp-content/uploads/2020/02/100_1165-scaled.jpg?resize=1536%2C1024&ssl=1 1536w, https://i0.wp.com/www.americanpartisan.org/wp-content/uploads/2020/02/100_1165-scaled.jpg?resize=2048%2C1365&ssl=1 2048w, https://i0.wp.com/www.americanpartisan.org/wp-content/uploads/2020/02/100_1165-scaled.jpg?resize=610%2C407&ssl=1 610w, https://i0.wp.com/www.americanpartisan.org/wp-content/uploads/2020/02/100_1165-scaled.jpg?resize=1080%2C720&ssl=1 1080w, https://i0.wp.com/www.americanpartisan.org/wp-content/uploads/2020/02/100_1165-scaled.jpg?resize=1320%2C880&ssl=1 1320w, https://i0.wp.com/www.americanpartisan.org/wp-content/uploads/2020/02/100_1165-scaled.jpg?w=2160&ssl=1 2160w” sizes=”(max-width: 300px) 100vw, 300px” data-recalc-dims=”1″ />

The annual stew.

Every fall in the rural southeast communities have a stew. Every church, every volunteer fire department, and many civic clubs. Its a good fundraiser but its a hell of a lot more than that. Its a tradition and a symbol of our cultural connection with the land. Back in the less-modern era people ate a diet based on what they had at the time. Vegetables followed the harvest seasons, meats followed the livestock slaughter schedule, and at the end of the year and through the winter, stews were made from whatever was left over to prevent spoilage. Crops and livestock were hard earned like everything else. Waste not, want not.

<img class=”size-medium wp-image-9608 alignleft” src=”https://i0.wp.com/www.americanpartisan.org/wp-content/uploads/2020/02/100_1163.jpg?resize=300%2C200&ssl=1″ alt=”” width=”300″ height=”200″ srcset=”https://i0.wp.com/www.americanpartisan.org/wp-content/uploads/2020/02/100_1163-scaled.jpg?resize=300%2C200&ssl=1 300w, https://i0.wp.com/www.americanpartisan.org/wp-content/uploads/2020/02/100_1163-scaled.jpg?resize=1024%2C682&ssl=1 1024w, https://i0.wp.com/www.americanpartisan.org/wp-content/uploads/2020/02/100_1163-scaled.jpg?resize=768%2C512&ssl=1 768w, https://i0.wp.com/www.americanpartisan.org/wp-content/uploads/2020/02/100_1163-scaled.jpg?resize=1536%2C1024&ssl=1 1536w, https://i0.wp.com/www.americanpartisan.org/wp-content/uploads/2020/02/100_1163-scaled.jpg?resize=2048%2C1365&ssl=1 2048w, https://i0.wp.com/www.americanpartisan.org/wp-content/uploads/2020/02/100_1163-scaled.jpg?resize=610%2C407&ssl=1 610w, https://i0.wp.com/www.americanpartisan.org/wp-content/uploads/2020/02/100_1163-scaled.jpg?resize=1080%2C720&ssl=1 1080w, https://i0.wp.com/www.americanpartisan.org/wp-content/uploads/2020/02/100_1163-scaled.jpg?resize=1320%2C880&ssl=1 1320w, https://i0.wp.com/www.americanpartisan.org/wp-content/uploads/2020/02/100_1163-scaled.jpg?w=2160&ssl=1 2160w” sizes=”(max-width: 300px) 100vw, 300px” data-recalc-dims=”1″ />Its a tradition that my own family and friends still follow today, and one that I always look forward to. The Fall is my favorite time of the year for a lot of reasons, and making a hearty stew, chili, and chicken mull is a big part of that. But that annual stew wouldn’t be possible without a few critical tools. I have a large cast iron stew pot, its iron stand, a large steel disk wok, a large dutch oven and a medium dutch oven, all cured with lard and easy to cook on off-grid. With these tools I can make nearly any meal and feed large groups of people in the process.

<img aria-describedby=”caption-attachment-9660″ class=”wp-image-9660 size-medium” src=”https://i2.wp.com/www.americanpartisan.org/wp-content/uploads/2020/03/100_1255.jpg?resize=300%2C200&ssl=1″ alt=”” width=”300″ height=”200″ srcset=”https://i2.wp.com/www.americanpartisan.org/wp-content/uploads/2020/03/100_1255-scaled.jpg?resize=300%2C200&ssl=1 300w, https://i2.wp.com/www.americanpartisan.org/wp-content/uploads/2020/03/100_1255-scaled.jpg?resize=1024%2C682&ssl=1 1024w, https://i2.wp.com/www.americanpartisan.org/wp-content/uploads/2020/03/100_1255-scaled.jpg?resize=768%2C512&ssl=1 768w, https://i2.wp.com/www.americanpartisan.org/wp-content/uploads/2020/03/100_1255-scaled.jpg?resize=1536%2C1024&ssl=1 1536w, https://i2.wp.com/www.americanpartisan.org/wp-content/uploads/2020/03/100_1255-scaled.jpg?resize=2048%2C1365&ssl=1 2048w, https://i2.wp.com/www.americanpartisan.org/wp-content/uploads/2020/03/100_1255-scaled.jpg?resize=610%2C407&ssl=1 610w, https://i2.wp.com/www.americanpartisan.org/wp-content/uploads/2020/03/100_1255-scaled.jpg?resize=1080%2C720&ssl=1 1080w, https://i2.wp.com/www.americanpartisan.org/wp-content/uploads/2020/03/100_1255-scaled.jpg?resize=1320%2C880&ssl=1 1320w, https://i2.wp.com/www.americanpartisan.org/wp-content/uploads/2020/03/100_1255-scaled.jpg?w=2160&ssl=1 2160w” sizes=”(max-width: 300px) 100vw, 300px” data-recalc-dims=”1″ />

Corn tortillas and four cups of boiled white rice. Dirt cheap meal that can feed a lot of people.

There’s a strong parallel to this and those cultures overseas, especially in Afghanistan. In most rural cultures around the world you’ll find a community kitchen in the small villages or groups of mud huts. In the center you’ll typically find a firepit, a few pots, usually a pressure cooker, and in some places a large metal disk much like the discada that I use. Its cooking gear that they’ve been using for generations, much like we did not that long ago.

The community kitchen, so to speak, is built to feed everyone- not just individually. A group learns to live off what they have, source their food from their environment, and know what goes a long way to sustaining the most, quickly and efficiently. Rice and beans are a staple food in most parts of the world. Cooking them is fairly straightforward and its a cheap food to stock up on. You can pick up a 20lb of rice and another 4lb of red beans for just over $30 total- and that will feed a small group of people for a good while. All you need is clean water and wood for the fire, and you’re good to go. Add in some bullion cubes for flavor and have some canned meat for long term storage and you’ll be the rock star of your group when people get burned out

<img aria-describedby=”caption-attachment-9657″ class=”wp-image-9657 size-medium” src=”https://i1.wp.com/www.americanpartisan.org/wp-content/uploads/2020/03/100_1252.jpg?resize=300%2C200&ssl=1″ alt=”” width=”300″ height=”200″ srcset=”https://i2.wp.com/www.americanpartisan.org/wp-content/uploads/2020/03/100_1252-scaled.jpg?resize=300%2C200&ssl=1 300w, https://i2.wp.com/www.americanpartisan.org/wp-content/uploads/2020/03/100_1252-scaled.jpg?resize=1024%2C682&ssl=1 1024w, https://i2.wp.com/www.americanpartisan.org/wp-content/uploads/2020/03/100_1252-scaled.jpg?resize=768%2C512&ssl=1 768w, https://i2.wp.com/www.americanpartisan.org/wp-content/uploads/2020/03/100_1252-scaled.jpg?resize=1536%2C1024&ssl=1 1536w, https://i2.wp.com/www.americanpartisan.org/wp-content/uploads/2020/03/100_1252-scaled.jpg?resize=2048%2C1365&ssl=1 2048w, https://i2.wp.com/www.americanpartisan.org/wp-content/uploads/2020/03/100_1252-scaled.jpg?resize=610%2C407&ssl=1 610w, https://i2.wp.com/www.americanpartisan.org/wp-content/uploads/2020/03/100_1252-scaled.jpg?resize=1080%2C720&ssl=1 1080w, https://i2.wp.com/www.americanpartisan.org/wp-content/uploads/2020/03/100_1252-scaled.jpg?resize=1320%2C880&ssl=1 1320w, https://i2.wp.com/www.americanpartisan.org/wp-content/uploads/2020/03/100_1252-scaled.jpg?w=2160&ssl=1 2160w” sizes=”(max-width: 300px) 100vw, 300px” data-recalc-dims=”1″ />

Marinaded chicken, bell, poblano and serrano peppers and mushrooms. All locally sourced, cooked off grid, prepared for eight adults.

on freeze dried food or MREs.

Maybe its the attitude I hold towards greater sustainability, maybe its my ongoing love of re-wilding, or maybe its partly trying to squeeze everything I can out of my hard earned money, but my approach to prepping and survivalism is to know how to provide and prepare that next meal for my family- not just tomorrow, but forever. There’s a learning curve to it, but for me at least its worth it on many levels to have and practice the skills to survive rather than simply bank on prepared foods alone to carry us through. I have those too, but they’ll be the last in the rotation after I’ve exhausted every other option. No matter what the crisis, I’ve got the tools and skills to use it. And you should too.

Don’t panic. Just prepare.


Organic Prepper: Off-Grid Cooking Without Electricity

Resilience homesteader Kara Stiff has written a nice article for The Organic Prepper – Off-Grid Cooking Lessons: How to Prepare Food Without Using Electricity – in which she writes of the effort made to reduce electricity use in order to make going off-grid affordable, and how she cooks during winter and summer.

Much of the remaining usage is cooking, so we got set up to cook mostly off-grid.

I say mostly because we still have a crockpot, a toaster oven, and an electric kettle to help us integrate our schedule with that of the outside world. The wage-earner can have his tea when he leaves before the morning fire. The family can have a hot dinner after a day away, or simmer broth overnight. These are convenience devices; we don’t rely on them for our main cooking needs.

Winter off-grid cooking

For winter cooking we use our wood stove, a Vermont Bun Baker. It has an oven and a cooktop. Ours is also set up to make hot water in an open-vented thermosiphon loop. That heat is transferred to the pressurized plumbing through a setup that works surprisingly well, though it was prohibitively expensive. I was nervous about planning a house with a wood cookstove because while I’d cooked on a few, I hadn’t lived with one long-term. But there wasn’t room in our 725-square-foot house for two stoves nor was there room in our tight budget. It was one or the other.

In reality, I adjusted to cooking on a wood stove fairly quickly and easily. The oven only gets good and hot when the stove runs for a while, so I only bake in the coldest months, which is fine because I’m not really into baking. Shorter fires are enough to roast peanuts for homemade peanut butter, or eggshells to crush for the chickens.

Surprisingly, I burn dinner less often on the woodstove than I did on electric or gas stoves, probably because it just takes as long as it takes. There’s no way to impatiently turn the heat way up like on an electric, only to regret it when the food blackens. It doesn’t really take longer to make dinner, though, because I use the heating-up time well. I also burn myself on it less often, probably because the woodstove is hot not just on the top but down the front as well, so it’s impossible to forget that it’s hot. The children have great respect for it and have not come close to even a minor burn.

If you care about environmental damage as we do, a wood stove is not the most environmentally-friendly choice. I did some math and discovered that the one and a half cords of home-grown and salvage wood we burn per year is definitely environmentally worse than using electricity to accomplish the same tasks, but not by that much (see a more in-depth discussion here). Though my family carefully considers environmental concerns in every decision we make, we also care a lot about resilience. In the end, resilience won out for the critical tasks of winter heat and cooking…

AYWTGS: 10 Kits to Put Together Today

Karen at A Year Without the Grocery Store has had to bug out three times, twice for riots and once for a tornado. She has enough to say about preparedness that she’s written a book and started a website. In the article, 10 Kits to Put Together Today to Be Ready for Tomorrow she talks about a variety of kits to have prepared so that you aren’t spending precious time rummaging around trying to find a light or cook stove.

1.) Where is the closest flashlight to you at this moment?

2.) Do you have an air filtration mask and could you put your hand on it in two minutes or less?

3.) What items do you have to keep your house cool and where do you keep them?

4.) If you had to remove stitches yourself, do you have the tools to do it?

5.) What’s your secondary method of communication?  Is it charged and ready?

So how did you do on the quiz?  Obviously, there’s no right or wrong answer.  The bigger question is  – could you answer each question.

Each of these things above is integral to preparedness.  Sometimes, we have these things – which is HUGE!  If you just have these things – high five!

More often than not though, if we have these things, we don’t know where they are.  So how do we organize things so that we KNOW that we KNOW where things are?

We develop kits!

Each kit is self-contained and is kept in tote.  For larger items, I keep them in large totes from Costco.  For smaller kits, I keep them in smaller totes which fit in the large Costco totes.   So what kinds of kits should we be putting together?  I’m going to be giving you a list of 11 kits.  I’m going to give you an overview here, but I’ll be doing a post on each of these so I can dive deeper.

Now there is one very well known kit that I am not including in this and it’s called a Bug out Bag or Grab and Go Bag or many other things.  A Bug Out Bag is for leaving the area, and we’ll cover that at some time.  These kits are all about what you are ready for at home.  So we’ll jump right in with kit #1.

Click here to read the entire article at A Year Without the Grocery Store.

Food Storage Feast Online Course 7-Day Trial

Food Storage Feast is an online course offered by Chef Keith Snow for cooking with long term storage foods. It usually costs around $100 to sign up for the course, which gives you access to the material, well, apparently forever. Chef Snow currently has an offer up for a free seven day trial. If you are already comfortable with cooking and aren’t too worried about what you will do with your storage food, then this class probably isn’t for you. However, if you don’t do a lot of cooking, are unsure about what you can do with storage food, or haven’t started collecting any long term storage food because you aren’t sure what to do, then it may be worth your while to take a look at the course.

Chef Snow got into food preparedness as a result of his own hardships following the 2008 financial crash, so his course is inspired with an appreciation for prepping and having used inexpensive food storage to make it through hard financial times. He seems to respond readily to questions through the course or email and also has a Facebook group for the course.

Wisely, forward-looking folks like you put up extra food for hard times – enough to get you through a month or two, or even a year of societal upheaval. It’s insurance you can eat when times get tough.

But are you prepared to prepare it?
Learn to turn your rice, beans, potatoes, freeze-dried stuff, and other long-term storage ingredients into a steady supply of delicious meals your family will love.
Food Storage Feast is full of step-by-step recipe videos and detailed, actionable
info on selecting and storing foods you’ll be excited to cook and eat.
Build confidence, cut your grocery bill, become a better cook, and lock food security into
your life now, before you actually need it. Don’t get stuck in long lines with the unprepared masses.

Our course is built on three keystones:

  1. Written modules. We explain what foods to store, how to store them, and how to use these foods in your kitchen. We get into the nuts and bolts of each key ingredient, and give you all the knowledge you need to integrate your preps into your daily life before you need to depend on them in a crisis. (These written modules will become part of the forthcoming Food Storage Feast eBook, included with the course.)
  2. Recipe videos. Step-by-step, in high definition, Chef Keith shows you how to make each recipe. We encourage you to try every recipe at least once, then pick your favorites, and make these dishes the foundation of your personal food storage plan.
  3. Community. Food is for sharing, right? After you share it at your table, please share your results and experiences —with us, with other students via our threaded comments, social media and in person to friends and family who might benefit from this information.

It’s sharing with other students and interacting with the instructors that makes this an actual course and not just a collection of articles and videos.

American Partisan: Cast Iron

NC Scout has a nice article on Cast Iron over at American Partisan. Besides the utility and aesthetic of a lovely cast iron piece of cookware, cast iron skillets excel at providing constant, high heat for things like browning large cuts of meat, making cornbread, and shallow frying. Too high of heat, though, can damage the seasoning on a cast iron skillet, but you can keep an unseasoned pan around for extra-high heat frying.

The cornerstone of any survivalist, prepper or primitive living-type kitchen is a healthy rack of cast iron. Once nearly extinct in the late 20th Century, cast iron is experiencing a rapid and very welcome resurgence amid people slowly but surely rejecting modernism in lieu of a simpler and more sustainable life. But re-learning the ways of yore comes with challenges. Cast Iron is not plug and play; it takes a bit of care and preparations in order to gain the best results and in the case of grinders, not damage the tools themselves.

As stated, these are things that used to be common knowledge. In my relatively brief life, luckily I learned the value of great living that I would later come to know as Survivalism early on. Sadly those Depression-era vessels of knowledge are dying off, and only a fraction of our current population seem to retain what’s being lost. Regardless, let’s do our part to spread the knowledge- it’s coming back and its certainly a welcome sight among modern ‘wonder kitchen wear’ which feature unnatural and potentially dangerous chemicals when compared to simple iron with a lard cure.

Cast Iron requires a decent amount of attention before being used, but once done properly, will last your lifetime and most likely that of your kids, probably longer. I’m not a fan of “non-stick” junk or tools that otherwise are meant to be used for a while then thrown away. Aside from being potentially dangerous, they typically don’t hold up long when used anywhere other than a home kitchen. To me, it’s a waste of resources and promotes materialism. Cast Iron in many places is considered a family heirloom- often times at least one generation old. Today’s households are having to often buy new as they’re rediscovering the value of Cast Iron cookware. Every family should have at a minimum one Large Pan, one Small Pan and a Dutch Oven. The Large Pan for general purpose frying, the Small for smaller meals or making cornbread, and the Dutch Oven for deep frying, cooking chicken, pot roasts, etc, or making huge pots of chili or stew in the winter.

If buying new- buy American! Lodge still makes products in the US, and is the only one that I know of that does. One annoying thing that they do is ship their pieces with a non-stick coating, which in my experience turns into a mess after a while. Remove this by soaking the pan in hot soapy water and scrubbing, then allowing to air dry. Once done you’re left with bare metal and a generally rough casting. I use an orbital sander to smooth this out. Once done get a can of Crisco or even better, Lard, and liberally coat the iron. Set the oven to the self clean mode if you have it, or 450 deg, and bake the pan upside down for an hour. Put a drip rack underneath the pan to stop any drippings from falling on the heating element. This process will stink. Make sure you open a window.

rusty.jpeg
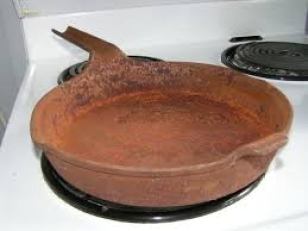
If finding one used, sometimes a great bargain can be found if not in a good condition, such as a rusty one seen here. The easiest way to clean them, as I did two very old belted kettles I inherited, is to first  rough the rust up with course sand paper, then soak them in a cola and lime juice mix. The acidity of the liquid will remove the rust after a few days. Allow it to dry, then go through the seasoning process I detailed above. You’ll have a perfectly serviceable piece of cast iron made new once again to last a lifetime.

While using, keep in mind that cast iron is different from modern pans; they heat up slow, and hold that heat for a long time. You also don’t need as much heat in order to fry. Most of the time medium heat works just fine. Regular maintenance is pretty simple; rub it down with vegetable oil every once in a while, and the seasoning will stay fresh. Do not wash the pans. Wipe them down to clean them…

Finish reading this article at American Partisan by clicking here.