Upcoming Homestead Classes with Julie Michener, Feb. – Mar. 2021

Upcoming Homestead Classes with Julie Michener
3674 N. County Line Road. Grandview.
Classes are free but RSVP via text (509-830-5431) is required as class space is limited.

Canning Class

THIS SATURDAY…Feb 6. 1-3pm
Pressure can a load of dry beans and meat with me and ask any questions you have!
Save the date…

Food Storage Class

Saturday, Feb 20th, 1pm to 3pm
What to store, how much to store, how to store it, and how to use it all to feed your household.
Coming in March…

Hands on Gardening Class

Saturday, March 13th from 1:00 pm to 3:00 pm
Composting, building seed beds, planting, transplanting, irrigation, raised beds, trellis, high tunnels and cold frames.

Spotter Up: Homestead Indoor Gardening

In this post at Spotter Up, Alaskan homesteader David Donchess talks about some food plants that he grows indoors. For people in a preparedness mindset, having food through a long winter can be a big concern. David mentions growing potatoes in a plastic bin indoors to provide food throughout the winter among others. Homestead Indoor Gardening: Plants To Grow

Ever since I moved up to Alaska with my wife, we have tried to be more self sufficient. We have really been drawn into growing our own food, to include livestock. The challenge for us in Alaska is keeping our plants and livestock alive during the winter. The summers churn out many world record sized crops due to the extremely long and warm days. Winter, on the other hand, produces the shortest(4-5 hours of sun) and coldest(-30 to -40) days. The harsh winters here can kill most types of perennials if they are not bred to handle cold down to -50. For this reason, indoor gardening is probably your best bet for continuing production of certain plants like leafy greens and things like strawberries and peppers. For this article, I am just going to talk about some of the plants I have in my indoor greenroom and why I grow them.

THE FOCUS

When we start talking about indoor plant growing, we have to keep in mind that the point is to have the ability to be mostly self-sufficient. The reason for growing plants indoors at my house is not to have something nice to look at, but rather to have a healthy variety of foods to eat and cook with. The main focus, due to limited space, should be to grow plants that are nutrient rich and will give you the best return for your efforts. But don’t forget that some nutrients you need cannot be found in just one plant. You will need to do your research and find a variety of foods that give you a decent return in vitamins, minerals, and macro nutrients.

For my plant selection, I have a few plants that offer the same return in certain nutrients, but lead in one area over the others. Then I have certain plants that are just more versatile and can be used in more ways and in more dishes than others. The choice is yours, but I have spent alot of time deciding what plants are worth the investment. Now keep in mind that this is not an indoor garden that is designed to provide everything during the apocalypse. If that were the case, perhaps we would want to simplify the number of plants we have to a short list that will allow us to minimize the need for water and light.

This specific selection of plants require varying ranges of attention, and it is all based on my abilities, space, and the time I am willing to invest in these plants. Each person will have different capabilities, space, funds, and time, which will determine what they grow indoors…

There are vegetables that I like to grow in order to provide a more diverse and balanced nutrient return, while also helping enhance the flavor of your meals. These veggies offer things that you may not be able to get from leafy greens like calories, protein, and higher concentrations of certain nutrients. Here is a list of the vegetables I like to grow and why.

-Broccoli: This vegetable is a powerhouse for sure. Raw, it has a higher concentration of vitamin C than an orange, and about as much calcium as whole milk. The plant can be a bit difficult to get control of since you have to trim the florets before they bloom. But if you take care of your broccoli plants, they will produce for you over and over again with increasing return as time goes on.

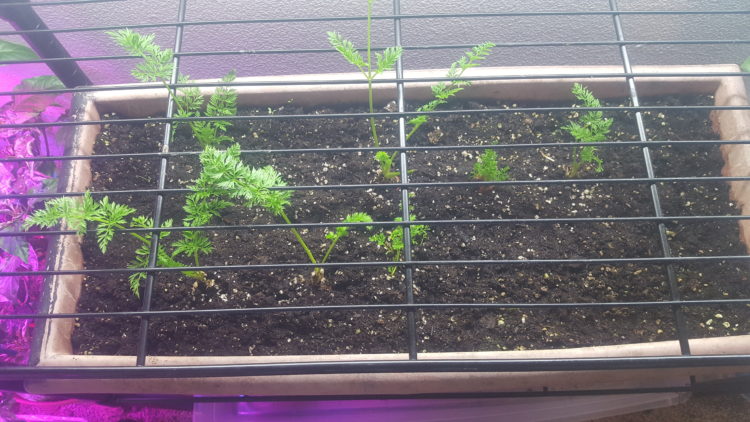
-Carrots: This veggie is one of the more versatile since it can be prepared and consumed in pretty much any way that you can imagine. Just a little bit of carrots can easily provide a huge amount of vitamin A to your diet. It takes some patience to get them to harvest. You can actually reuse the carrot heads to make more carrots, making this a somewhat renewable vegetable.

-Bell Peppers: I like growing these because they add a good deal of texture to my meals. If I am making burritos or a stir-fry, you bet that Bell Peppers are going to be included. They give a decent return in vitamin C, but not much of anything else. For the most part, the plants are easy to maintain and grow indoors as long as you provide a steady temperature and don’t let the soil get too wet…

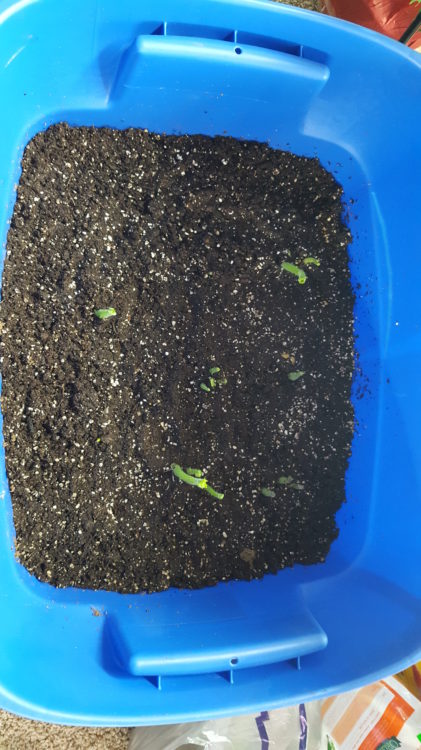
Potatoes are a big thing for my household to the point that I grow them indoors during the winter in big storage bins. They take some time to grow to maturity, but they offer so much in terms of calories and just energy overall. They are very filling and you can add them to pretty much anything. They are relatively maintenance-free except for periodic watering, and they give back alot in return…

Click here to read the entire article at Spotter Up.

Organic Prepper: Off-Grid Cooking Without Electricity

Resilience homesteader Kara Stiff has written a nice article for The Organic Prepper – Off-Grid Cooking Lessons: How to Prepare Food Without Using Electricity – in which she writes of the effort made to reduce electricity use in order to make going off-grid affordable, and how she cooks during winter and summer.

Much of the remaining usage is cooking, so we got set up to cook mostly off-grid.

I say mostly because we still have a crockpot, a toaster oven, and an electric kettle to help us integrate our schedule with that of the outside world. The wage-earner can have his tea when he leaves before the morning fire. The family can have a hot dinner after a day away, or simmer broth overnight. These are convenience devices; we don’t rely on them for our main cooking needs.

Winter off-grid cooking

For winter cooking we use our wood stove, a Vermont Bun Baker. It has an oven and a cooktop. Ours is also set up to make hot water in an open-vented thermosiphon loop. That heat is transferred to the pressurized plumbing through a setup that works surprisingly well, though it was prohibitively expensive. I was nervous about planning a house with a wood cookstove because while I’d cooked on a few, I hadn’t lived with one long-term. But there wasn’t room in our 725-square-foot house for two stoves nor was there room in our tight budget. It was one or the other.

In reality, I adjusted to cooking on a wood stove fairly quickly and easily. The oven only gets good and hot when the stove runs for a while, so I only bake in the coldest months, which is fine because I’m not really into baking. Shorter fires are enough to roast peanuts for homemade peanut butter, or eggshells to crush for the chickens.

Surprisingly, I burn dinner less often on the woodstove than I did on electric or gas stoves, probably because it just takes as long as it takes. There’s no way to impatiently turn the heat way up like on an electric, only to regret it when the food blackens. It doesn’t really take longer to make dinner, though, because I use the heating-up time well. I also burn myself on it less often, probably because the woodstove is hot not just on the top but down the front as well, so it’s impossible to forget that it’s hot. The children have great respect for it and have not come close to even a minor burn.

If you care about environmental damage as we do, a wood stove is not the most environmentally-friendly choice. I did some math and discovered that the one and a half cords of home-grown and salvage wood we burn per year is definitely environmentally worse than using electricity to accomplish the same tasks, but not by that much (see a more in-depth discussion here). Though my family carefully considers environmental concerns in every decision we make, we also care a lot about resilience. In the end, resilience won out for the critical tasks of winter heat and cooking…

True North Life: Making Maple Bacon

Gillian has a nice blog, discussing aspects of her homesteading life in Ontario – True North Life. In this entry she talks about Making Maple Bacon. Mmm, delicious, delicious bacon.

…As with all meat curing or meat projects, it starts with a great cut of meat. For bacon, you want a nice juicy looking pork belly. Remember this process takes time so you want a pork belly worthy of your efforts. This means from organic hogs or hogs raised humanely without hormones or antibiotics. Or from a heritage breed like Berkshire, Duroc, or Kurobuta. Each has a richer, meatier, more distinctive flavour than industrial pork bellies. By the way, a full pork belly weighs 10 to 12 pounds. Whole Foods will sell you pork bellies by the pound, which may be easier to handle for home smokers. Our smoker can’t handle a whole 12lbs so we usually go for the 2-3lbs and we don’t want to make to much of the same kind of bacon at once until we learn our favourites.

After getting your meat youll need to prep it to be cured. The bottom of a pork belly usually comes with skin (rind), which will be tougher than the rest of the bacon. (It also blocks the absorption of the cure and smoke flavours.) Commercial smokehouses remove it using a slicing machine. At home, you’ll have to work a bit harder. Start at one corner and use a sharp, slender knife to separate the skin from the meat, angling the knife blade toward the skin. Better yet, ask your butcher to skin it for you. Do not discard the pork skin. Direct grill it over a medium flame on both sides (start belly side down) until crisp and golden brown to make “brownies”—crackling crisp bits of skin to fold into pulled pork. Or deep fry it in oil to make chicharrones (pork cracklings). It can also be used to give flavour to beans or greens.

Next is seasoning the meat, the basic ingredients are salt and sugar and optional curing salt (sodium nitrite) and pepper. You can achieve a wide, subtle range of flavours by varying the source and proportions of these ingredients: white sugar or brown sugar, maple sugar, or even freeze-dried cane sugar juice. Ground or cracked black pepper or hot pepper flakes. Bacon makers in Scandinavia add juniper berries and other aromatic spices. For this round, we used maple syrup, brown sugar, and curing salt to make maple bacon for breakfasts. How you season depends on who you ask, and the type recipe you use, since this recipe is mostly liquids we simply poured the ingredients into a large zip lock bag mixed and mixed it well before placing the meat inside…

Click here to read about the entire process.

Sensible Survivalists: Basic Homesteading Skills My Grandmother Learned

The Sensible Survivalists have a nice article up titled The Basic Homesteading Skills My Grandmother Learned During WWII And Then Passed On To Me.  If you are getting ready to start your first garden or just beginning to move toward more self-sufficiency, it’s a good read to get you on your way.

I think the person who taught me the most, especially about homesteading, was my wonderful late grandmother.

She was a young woman in England during the Second World War. It was a difficult time for everyone, especially families. Food and resources were limited, and morale had to be kept up. She and her friends learned so many new skills in order to cope, and managed to make it through in one piece.

My grandmother passed on some of her homesteading skills to me, which has been invaluable for our own experience. Along with those skills, she taught me to be resourceful, resilient, imaginative and tough, and I’ll always be grateful to her for that.

In this post, I want to pass my grandmother’s wartime beginner homesteading skills on to you.

I think there’s something wonderful about taking the painful lessons that our parents and grandparents learnt during difficult times, and then learning and growing from them. I sometimes wish I could go back in time. I would go and speak to my grandmother, aged 17, trying to get a coop of stubborn chickens to lay eggs, and I would tell her that generations and decades into the future, her granddaughter would be applying those lessons to her own homesteading life. I think she’d be happy about that.

To put together this post, I’ve gone back through our family archives, my grandmother’s old notebooks and a few Internet sites to collects facts, pictures and lessons we can learn from today. I’ve found the old WWII posters that my grandmother will have seen at the time, and will share those with you…

The Prepared Homestead: Intro to Family Herbal Medicine

The Prepared Homestead will present an introduction to family herbal medicine on Friday evenings from July 7th, 2017 through September 8, 2017 from 5:30 to 8:00pm in Cocolalla, Idaho.

Family Herbal Medicine

Come spend Friday Evenings July 7-Sept 8 5:30-8:00 PM on the homestead learning about Family Herbal Medicine and working with herbs. Herbalism has been around for thousands of years. It has been the traditional method used by people on every continent to support health and bring healing. Today there is a resurgence, a renewed interest in taking charge of our own health and educating ourselves on family herbal medicine know-how. In this 10 week program my goal is to build your confidence in your knowledge and ability so you feel equipped to take care of your family’s basic health needs. Each of these sessions is available individually, they are also available at a discount as groupings (see description below) or at a significant discount when you register for the entire program.

What we will cover over the 10 weeks –


Session 1: Introduction to western herbalism & Burns, Stings, & Rashes

echinacea

  • Why use herbs? Why study family herbal medicine?
  • Basic safety precautions
  • What herbs are growing around your yard you can use to ease stings and bites
  • How to heal a burn fast and reduce scarring
  • Herbs for skin rashes, diaper rashes, and facial breakouts
  • You’ll also learn the basics of making a poultice and when to use this type of treatment as well as drying herbs, part 1

Session 2: Wounds, Bruises, & Cuts

  • How to stop a bleeding injury
  • Best herbs for reducing swelling
  • Herbs that eliminate infection
  • Herbs to have in your family First Aid Kit
  • In this session we will learn to make a soothing compress and continue our discussion on drying herbs

Session 3: Coughs, Colds, & Congestion

  • Intro to wildcrafting
  • Learn the difference between types of coughs and which herbs to choose for each type
  • How to shorten the length of a cold
  • Herbs that help reduce congestion and allow for easier breathing
  • In this session we will make some herbal honey and cover the basics of an herbal bath & steam

Session 4: Fevers, Teething, & Ear Infections

  • When to worry about a fever
  • What herbs to use for different types of fevers
  • Herbs to soothe teething pain and irritability
  • How to treat ear infections naturally
  • We will cover the basics of making an infused oil

Session 5: Indigestion, Diarrhea, Constipation & Stomach Ache

  • We’ll talk about the importance of regular bowel movements and which herbs help
  • Herbs that are good for soothing stomach ache
  • How to reduce IBS and intestinal inflammation
  • We’ll discuss when to make a decoction and infusion and practice making both

Nourishing Herbal Infusion


Session 6: Tonic Herbs

  • This week we move into using herbs for daily health
  • We will cover my favorite herbs to take and what they are good for
  • Using Herbs as your vitamins
  • I will show you how to make a Nourishing Herbal Infusion

Session 7: Anxiety, Stress, Insomnia, & Headaches

  • Strategies for reducing stress and anxiety
  • How to use herbs to reduce the effects of anxiety
  • What herbs help quiet the mind and make it easier to fall asleep
  • Herbal treatment for tension headaches
  • In this session we will make an herbal tincture

Session 8: Menstrual Disorders

  • Herbs you can use to reduce cramping and eliminate bloating
  • Treating excess bleeding with herbs
  • In this session we will also discuss diet and lifestyle
  • We will create an infusion blend and a soothing massage oil

Session 9: Adaptogens & Immune Boosters

  • Reduce incidence of illness by using herbs
  • Increase your ability to handle stress and bounce back faster
  • My favorite adaptogens to use and how to easily incorporate them into your life
  • When to use herbs to boost immunity and when not to
  • Benefits of Bone Broth and basic recipe
  • In this session we will make an infused vinegar

Session 10: Balancing Female Hormones

  • Top 6 herbs for balancing hormones
  • Herbal protocol for taking control of your hormones once and for all
  • Lifestyle recommendations
  • Where to buy reliable herbs
  • Making your own capsules

This is 25 hours of herbal instruction and hands-on learning opportunity!

Each session costs $35 when bought individually.

You receive a 20% discount if you purchase one of my grouped sessions:

  • Session 1-5 $140.00
  • Session 6-10 $140.00

Or if you are ready to jump in and take control of your family’s health, then sign up for the entire Family Herbalism Course for only $250.00! That’s a savings of $100

I have space for only 10 people in each class. This is a very interactive, hands-on herb class so be ready to learn tons and have fun doing it!

**Cost for supplies is extra. The list will be emailed to you upon confirmation of enrollment or you can pay a small fee and I will provide all the supplies necessary for each session.


2018 Edit; They now have a ten month herbal school — Huckleberry Mountain Botanicals School.

The Prepared Homestead: Start Your Own Poultry Processing Business

The Prepared Homestead is offering a workshop in starting your own poultry processing business.  The cost is $49 per person and will be held July 1st, 2017 and July 29th in Cocolalla, Idaho.

Who is this workshop for?

Those interested in learning how to humanely, cleanly and efficiently process poultry. And those who are looking for a small business opportunity.

We started out processing our own poultry and in an effort to help us pay for the equipment we started taking on a few other people’s birds. In no time at all, we were able to stay busy processing as many birds as we wanted within our model.

What will you learn?

How to humanely, cleanly and efficiently process poultry (hands on practicum)
How to run a poultry processing line
Learn all the costs involved with processing
Learn the rules and regulations of processing in Idaho
Marketing, pricing and keeping happy customers

Cost? $49 per person

When? Based on the majority interest we came up with two dates: July 1st and July 29th. The workshops begin at 10 AM.

Where? Cocolalla, at The Prepared Homestead. We will provide directions after you register.

Bring a sack lunch!

How do I sign up?

  1. Click on the link below to pay for a class seat.
  2. Comment in the facebook group: The Prepared Homestead – Workshops and Classes on the pinned post with your date. Please keep in mind that we need a minimum of 4 students and a maximum of 10 per class date. First come, first served.

Reserve Your Spot!

Source: The Prepared Homestead – Start Your Own Poultry Processing Business