Primal Survivor: How To Get Water From A Well Without Electricity

Nicky Hoseck at Primal Survivor writes How To Get Water From A Well Without Electricity. Please visit the original article for more photos and videos.

If you’re going off-grid, you’ll need a water source, usually in the form of a well or borehole.

That’s all well (excuse the pun) and good when you’ve got the power to pump water from it, but if the grid goes down, you’re effectively upstream without a paddle.

Don’t despair – there are several ways to get water from your well without electricity – it just takes a little preparation and forethought.

7 Ways To Access Your Well Water Without Electricity

#1 Generator

Although only 5% of American homes have backup generators, they are one of the best ways to ensure consistent power regardless of grid problems or extreme weather conditions.

While a dual fuel generator may provide the most cost-effective solution, few can produce the voltage needed for a deep well pump to operate.

For deep well pumps, a diesel generator will provide a more effective solution as they are both portable and powerful enough to produce the pump’s required 220v.

#2 Solar Pump

There are numerous different types of solar well pumps available, the best of which can pump water from depths of 600’ or more.

A surface solar pump is a viable option for shallow wells and to move water from your storage tank to your home. For deeper wells, you’ll need a submersible solar pump.

The best solar well pumps can run off batteries as well as sunlight, making them a suitable option for accessing water during extreme weather conditions, as well as during a power outage.

On our small-holding, a submersible solar well pump pushes water to a storage tank at the top of the hill; we then rely on gravity to transport that water down to the house.

The benefit of this two-pronged approach is that we’re not solely reliant on the solar pump, and therefore sunlight, but can get a consistent water supply straight to the house regardless of the weather or the national electricity supply.

#3 Wind-Powered Pump

A wind turbine isn’t something you can always rely on to provide water when you need it as you can be sure the wind will drop the instant you decide you need it, but you can use it to pump water to a holding tank which can then be transported to your home by gravity.

Many home wind turbines can be hooked up to solar panels, providing two alternative power sources for those inevitable emergencies. Read more about hybrid wind and solar systems.

Although you’ll need to invest a few hundred dollars in a good-quality wind turbine, once in place, it costs very little to run or maintain.

If you lack the funds to buy a wind turbine but have an abundance of DIY know-how, you could make your own out of PVC piping, and an old car fan as demonstrated in the video below.

#4 Hand Pump

Green Hand Cistern Pump

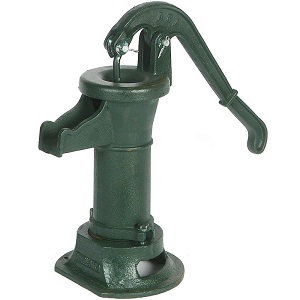
One of the simplest ways to get water from a well when the power’s down is via a hand pump. The best hand pumps can be alongside your electrical submersible pump, making it easy to swap from one.

Hand pumps are particularly effective for shallow wells and can draw water from a depth of 25’ or less without undue muscle fatigue on your behalf.

Accessing water that’s over 30’ down requires significantly more muscle power, which is why some deep well hand pumps can be linked to a windmill or operated via a foot valve.

A shallow well hand pump is simple to install and relatively affordable. It’s well worth paying that little bit extra for a high-quality pump, however, as you’ll be relying on it in your hour of need.

While you can pick up a pitcher pump for as little as $50, it’s more advisable to invest a few hundred dollars in getting a more reliable, better quality model, like the Pressurized Sealed-Top Water Pump from Lehman’s.

Deep well hand pumps cost considerably more, especially the Bison Stainless Steel Deep Well Hand Pump that can draw water up from depths of 300’. You may well need to be a potential contestant for the World’s Strongest Man competition to achieve this, but it is possible!

The best deep well hand pumps come with a lifetime warranty, require little maintenance and no priming, meaning that you can install them and forget about them until an emergency arises.

The main benefit of a hand well pump is that it requires nothing more than muscle power to operate it, which means you’ll have access to water in all weather conditions. If you opt for a solar pump, you’ll be reliant on sunlight whereas, with a generator, you need fuel.

The hand pump needs nothing at all, making it by far the most sustainable and reliable approach.

#5 Well or Sleeve Bucket

The sleeve bucket is the simplest and cheapest way to get water from your well without electricity. Also known as torpedo or cylinder buckets, the modern-day “well bucket is simply a long, skinny bucket that can be lowered into the narrow confines of a well casing to bring water to the surface.”

A high-quality sleeve bucket from Lehman’s costs less than $100, is made of galvanized steel, and can hold nearly 2 gallons of water. It has a handy device that enables you to discharge water from the bottom, rather than attempting to up-end it and empty it from the top.

If you’ve got access to some rope and PVC piping, you can easily make your own sleeve bucket which, while not as sleek or voluminous as a bought model, will still do the job effectively. Find out how to make your own PVC well bucket below.

The only problem with using a well bucket is that you’ll need to remove your submersible pump to get access. With most pumps, this is a fairly simple operation but it’s inconvenient nonetheless and not something you need to do if you have a hand pump.

#6 High Lifter Or Hydraulic Ram Pump

Depending on the topography of the land, you could use a hydraulic ram pump or a high lifter to access your well water. Both these pumps use downhill water pressure to push the water up to a higher point than the original source.

These gravity-fed water systems are easy to install and maintain but are only effective where there is a continuous supply of water and room to install the pump at least a foot and a half below that source.

While hydraulic ram pumps need a higher flow rate and can be rather noisy, high lifters can cope with as little as one gallon per minute and operate in virtual silence. As they are both self-powered, they don’t require any fuel, solar power, or electricity, so can operate regardless of power outages or severe weather conditions.

#7 Build An Emergency Pump

While I don’t feel my DIY skills would be up to the task of making a sleeve bucket, let alone an emergency well pump, there are plenty of people who’ve done just that and are willing to share their designs and methods.

The simplest type of pump to make is one that, like the pitcher hand pump, uses suction to draw water up. Designs like these are cheap and easy to make but will only work effectively on shallow wells.

For deeper wells, a vacuum pump is more effective and, although these are slightly more complicated and expensive to build, there are some informative online tutorials that give a complete list of materials and step-by-step instructions on how to complete the project.

Conclusion

If you’ve already got alternative energy sources, like wind or solar, on your property, getting water from your well when the grid goes down isn’t too much of a problem.

When severe weather conditions, like heavy rain or gale-force winds, disrupt your electricity supply, however, they’re liable to play havoc with those alternative sources as well, leaving you at the top of the well without any water.

The most reliable and sustainable ways of getting water from your well, therefore, are those that rely on gravity, like the hydraulic ram or high lifter systems, or those that need only muscle power.

While sleeve buckets are reliable and easy to use, in many cases, you must remove your submersible pump before you can start accessing the water, which is why the hand pump is the best method of getting water without electricity.

You can install a hand pump alongside your existing electrical pump so you can switch easily from one to the other without having to uninstall anything at all. A top-quality deep well hand pump can draw water from depths of up to 300’, keeping dehydration at bay whatever the weather.

Read more about the different types of well pump.

AYWtGS: Water Woes – How to Set Up a Portable Bathroom in an Emergency

A Year Without the Grocery Store talks about Water Woes – How to Set Up a Portable Bathroom in an Emergency. Being prepared and having a backup works for small events, like frozen pipes, as well as larger disasters.

Three years ago this week – Actually, on January 1st of 2018, I rolled out of bed and headed to the bathroom.  After “using the facilities” I flushed the toilet and went to wash my hands, but when I turned the faucet to the ‘open’ position, some sputtering water came out followed by nothing but air.

Water Woes - How to Set up a Portable BathroomYes, on January 1st, we found out that our pipes had frozen.  But. . . I was ready.  Awhile before, I had purchased everything that I needed to set up a portable bathroom.  Today, I want to walk you through the relatively easy process of making sure that you have what you need to set up a portable bathroom.  I’ll also share some tips and tricks on how to make it function more efficiently (and be less stinky).

***There are links in this post.  Some of the links may be affiliate links. My promise to you is that I will only recommend the most economical version of the best quality of items to serve you. All of these are the items that I have bought for my own family.  If you click on a link, your price will remain the same.  If you make a purchase, we may make a small commission that aids in the cost of the running of this website.***

Main parts of a Portable Bathroom System

There are two main parts to a portable bathroom – a portable toilet and a handwashing station.

Portable Toilet  Water Woes - How to Set up a Portable Bathroom

Getting ready to set up a portable toilet is fairly easy.

1.)  Find a place to put your portable bathroom.

On both instances that we had to set up our portable toilet, we have always used our main floor half-bath.  There is usually enough room to put a 5-6 gallon bucket where our legs would normally be with room around the outside to be able to step around it to get to the door.  If you don’t have anything like this, you could use the main larger bathroom in the house, or even the master bath.

If, however, you are completely devoid of any of these options,  you can work outside the box a bit.  There is such a thing as a pop-up privacy tent.  These are usually used for showers or portable toilets while camping.   You could set one of these up in an out-of-the-way room, but be warned, it won’t smell the best despite some suggestions that I will make later to keep the stench down.

2.)  Source your FREE 5-6 gallon bucket. 

Did you know that most grocery stores that have in-house bakeries will give away their frosting buckets (some of which are 5-6 gallons) for free?  So the next time that you’re in a grocery store that has a bakery, walk over and ask them if they have any empty frosting buckets that they are willing to give away.  Or you could even call ahead and ask for the bakery so that you can find out BEFORE you go whether or not they have any frosting buckets available at that moment.  Several bakeries have told me that they throw them out at the end of the day on the day that they empty them.

Once you get it home, you will have to clean it with warm soapy water – and maybe a smidge of bleach to get the residue out of it.  Once it’s clean and dried, you’re ready to use it when the need arises.

If, however, you prefer not to get free buckets, you can get cheap ones from any hardware store.  If you ONLY intend to use them for a portable toilet, you don’t need to bother with getting food-grade buckets.  Home Depot and Lowe’s both carry non-food grade buckets in their stores at reasonable prices.

Water Woes - How to Set up a Portable Toilet
Photo Credit: Amazon.com

3.)  Purchase your toilet seat and heavy-duty trashcan liners.

I purchased my snap-on toilet seat from Amazon, but I didn’t feel the need to purchase specialized “Doodie bags” or trash bags that are marketed to collect human waste.  We just used regular heavy-duty trash bags from Costco.

4.)  Purchase kitty litter or gather an alternative.

Kitty Litter?  Yes, kitty litter!  You need something that (1) will absorb liquid waste and (2) will help keep both the liquid and solid waste from smelling as bad as it otherwise would.  Kitty litter does passably at both of these.  It won’t keep it from stinking at all, but it will reduce the stench and will help absorb the liquid that you’ll be adding to the bag.

Don’t like the idea of using kitty litter?  There are other alternatives that you might have laying around for free.  Do you have a fireplace?  Start collecting the ashes in it.  They work fairly well at both absorbing the liquid as well as dealing with the smell.  Pine chips, sawdust, and newspapers torn into small strips also work.

Photo Credit: Amazon.com

Handwashing Station

We’ve covered what you need to be prepared to set up the portable toilet, but what do you need for a handwashing station.  You can go two different routes for this.

First off, you can use hand sanitizer.  And while this works fine if you just need to disinfect your hands, it doesn’t work if you also need to clean solid matter which may have gotten onto your hands from your ‘trip to the loo.’

We prefer to use our five-gallon water jug with a spigot.  This allows us to wash any dirt and debris from our hands after using the ‘facilities.’  But having both hand sanitizer and a five-gallon water jug with a spigot on hand can’t hurt.

Setting up a Portable Bathroom

So besides gathering the items that you need, there are few other points to help you set things up in a way that will serve you well.

In the “portable bathroom”

Whether this is an actual bathroom or a pop-up privy, it works similarly.  When you realize that you need to set up a portable toilet, grab your bucket, trash bags, snap-on lid, and odor fighter.

We double-line our bucket with two Costco heavy-duty trash bags and snap the toilet seat/lid onto the bucket over the two trash bags.

We take one of our glass bowls and fill it with kitty litter or ash and keep it in the sink.  If you are using a pop-up privy, then you’ll want something on which you can set your bowl – whether it’s just some newspaper on the ground to contain any stray particles or a stool to put it at a level easier to reach. Then we place a scoop of some sort – usually a measuring 1/2 cup into the bowl.  Once the facilities have been utilized, everyone is supposed to put a scoop of our anti-stink medium into the portable toilet.

Outside the Bathroom (or Privy)

Because we keep our bowl of kitty litter or ash in our bathroom sink, and because there isn’t much room on our bathroom sink, we have always placed our water jug with a spigot at the kitchen sink.  Our kitchen sink has always had ample counter space beside the sink on which to set our water jug.  It also allows for the flow of the jug into the sink, so we don’t have to worry about wastewater.

Another added benefit from doing it that way is that we always keep a hand towel near the sink, so we have a towel on which to dry our hands.

The process is a simple one, but if you haven’t thought it through, the first time could be more problematic than if you’d taken steps beforehand to know what you need to purchase and where you need to place it.

A practical benefit that we experienced

So before the incident when our pipes froze, my husband (the wonderful man that he is) only tolerated my prepping.  He acknowledged that at some nebulous day in the future we might have need of an item here or there, but he saw no practical purpose in keeping all this stuff around that we weren’t using on a regular basis.  And at that point, I would have said, “Don’t let me catch you getting him started on my food stash.”

But during Christmas vacation – while his dad was staying with us no less – our pipes froze, he realized that having items on hand was more than helpful.   By investing about $40, I had SAVED us hundreds of dollars.  It took four days for a professional company to figure out how to defrost our pipes so that we could have water.  We would have had to pay for 2 hotel rooms for 3 nights plus all the meals that we would have had to eat out.  It would have easily cost us $700-$1000.

But once he saw how a little money spent beforehand saved us a ton of money on a ‘regular day’ not some nebulous day after society collapses, his tone completely changed.  He went from reluctantly ‘allowing’ me to prep to being completely on board with my prepping.

Not only that, but he has become a driver in our prepping.  If I need something built, he’s right there to do it.  He makes suggestions on what we should do next.  He helps as we look for ways to make ourselves more self-sufficient right where we are.  We are much more of a team than we were before our pipes froze…

TACDA: Water – The Absolute Basic

Dr. Landon Beales has written an article for The Journal of Civil Defense on Water: The Absolute Basic on storage and purification of water.

Storing water is as easy as turning on the faucet—as long as you store it before an emergency arises! If you wait until it’s critical, then both frustration and costs increase – in direct proportion to the water’s availability! The following are some basic recommenda-
tions to guide you in this fairly simple storage project.

Recommendation #1: Store water from the source you are currently drinking.

Family members are accustomed to its taste and mineral content, so adjustment to “new” water won’t be necessary. There are enough other challenges during emergencies without being frustrated by your water supply.Recommendation #2: Store your water reserves in new, thoroughly cleaned, heavy duty, plastic containers with tight-fitting lids.

Heavy, plastic containers have the major advantage of being shatterproof and lighter than glass bottles or jugs.
The federal government, through the Department of Transportation, has developed a rigid burst test and handling standard (DOT #34) for plastic containers utilized in the interstate hauling industry. Plastic containers in this classification are designed to specifications for strength and transportability when filled with liquids. Plastic containers meeting DOT #34 are available in many sizes, ranging from 5-gallon to 55-gallon models. Water weighs eight pounds per gallon, so the 5-gallon container (at 40 lbs.) is about the maximum weight most people can carry – and just the right size for water storage. The 5-gallon container is designed for  tacking to conserve space and is easy to handle for rotating your water supply.

If you don’t have a storage space problem, the larger containers are better for consolidating and organizing water storage. If your storage space is fairly limited, smaller storage containers  facilitate stacking and moving them more often. Shipping-grade water containers, when filled with water, are capable of withstanding both hot and cold outdoor temperatures. This is important if some of your volume of water must be stored outside the protected environment of your living space.

There is always a great temptation to “keep it cheap” and store water in used containers. The difference in price of acquiring and preparing used containers is comparable to acquiring new equipment, all things considered. It’s not worth risking loss of your water supply by using containers of unknown origin and quality.

New containers should be sanitized. Rinse the new container with drinking water from a new, dedicated ‘drinking water safe’ hose (such as those used in campers). Rinse 55-gallon containers with a 50% solution of water and bleach. Wear rubber gloves and eye protection. Leave the bung filler cap slightly loose. Swish and roll the container so the bleach solution reaches all areas of the container. Let it sit for 10 minutes. Pour the solution back into a clean bucket and use it for the next container. Repeat the process. Pour out the solution before filling with clean tap water. The remaining bleach will ‘shock’ the drinking water. You may wish to add 1⁄4 c. bleach per 55-
gallon drum of water before tightly replacing the cap on the bung. Wash off the outside of the drum with clean water so as not to damage clothing or nearby items with bleach. Bleach residue is dangerous to your health. Filter water at point of use…(continues)

PDF of article from The American Civil Defense Association

The Medic Shack: Prepping 101 – Water

Chuck at The Medic Shack talks about water preparedness, including storage and sanitization in Water – Prepping 101 the Basics.

As the SARS-2-Covid-19 bug I coming for another round for us. And as we dig further and further into the latest high tech gadget to make sure our homes are free from the Virus. So do you have enough water? A lot of people found they had holes in their preps, or came up short for needed supplies. Also a lot of people found out that they didnt prep at all. So I decided to bring back the prepping 101 series. But do it as a prepping 101 Dont’ forget the basics. What are the basics?

  1. Store water (safely)
  2. Make sure you are able to cook the food you’ve stored
  3. Implement an off-grid waste system (Trash and toilet waste)
  4. Pack a bug out bag with a bug out plan

How many folks here store water? How do you store it? Do you rotate?? What do you do to preserve it?

As a child of the NM desert living in South Carolina, the waste here is DEVASTATING to me. Folks here literally let it run down the street! (Whoa panic attack coming on. DEEP breath) In a state where the water table is measured in inches rather than the hundreds of feet back home………

Back on topic. In our house we store 3 types of water. Yup y’all heard me. 3 types Bottled, Bulk and other. Bottled water. We store, on hand for each person 3 cases each Sounds like a lot, but in reality its only about 15 gallons. (Depending on the size of the case you buy.  YMMV.)

Why Bottled?

First its easy. Easy to store easy to grab and go with and easy to use in an emergency. Don’t be sucked into the Designer Waters. There is not a bit of difference between Great Value brand bottled water and the 5x as much case bottled by the leading cola company. 3 cases per person.

Bulk water.

Here is where storage becomes and issue. Bulk can be anything from 5 gallon bottles to the 300 gallon cube /caged containers and larger. The issue with storing large quantities of water is keep it “pure and sanitized”

Back in the day.

Decades ago, Chris and had a water bed. It was NOT a good storage idea. Well it was’t a good Idea to have to sleep on your storage Keeping it clean and drinkable was tough. Heated water loves to grow bugs. But it gave us and idea. We tried twin sized bed bladders. They worked but they are a pain to handle. And they need a frame to support them.

The 21st century.

Thankfully today bulk water storage is easier. We use a couple of things. First is the 360 gallon “Cubie” container. That contains rain water that is sanitised for dinking if needed, but it is our “Other” water. It is to flush the toilet, wash dishes, wash hands and people. In a pinch we can drink it safely. Also its to water our garden. South Carolina has lots of rain. So refilling it is not an issue Its big,. Its bad and a hurricane isnt moving it. In the house we have racks of 5 gallon containers. We use this 4 tier high bottle rack.

Each person in the family has 1 rack 20 gallons of for each person. Also just ordered one of these pumps for the 5 gallon water bottles. My wife has trouble lifting it on the dispenser. This will make it a lot easier. This is the one we bought.

More bulk.

Under each bed is a 50 gallon bladder. Today the one that we used has been replaced by a better one for what we paid for ours. The new one is 60 gallons tougher and no plastic taste that ours had for a long time.

That is a lot of water!

It seems so. 1 360 gallon cube container. 4 5 gallon bottles of water per person. 1 50 gallon water bladder per person. It comes out to 730 gallons of water in our house. Thats a metric poop ton (As my eldest Jake says!) of water. According to the EPA we use about 300 gallons per person per day. That 730 gallons we have put by will only last a 2 people 2 ¼ days give or take. Most medical people suggest that we drink at least 4 quarts (1 gallon) of water per day. We can double or even triple that depending on exertion level, temperature and humidity.

Now add in water needed for food prep washing up and basic hygiene, and you could hit 10 gallons a day. Doesn’t sound like much compared to 300 gallons. But at that rate you’d be out in a week. I wrote a piece on sanitizing for the Covid virus In it I talked about using bleach and pool shock to make bleach. Looking at it we didn’t talk about using it to purify water

Sanitizing water

Disinfect water using household bleach, if you can’t boil water. Only use regular, unscented chlorine bleach products that are suitable for disinfection and sanitation as indicated on the label. The label may say that the active ingredient contains 6 or 8.25% of sodium hypochlorite. Do not use scented, color safe, or bleaches with added cleaners. If water is cloudy, let it settle and filter it through a clean cloth, paper towel, or coffee filter.

    • Locate a clean dropper from your medicine cabinet or emergency supply kit.
    • Use the table below as a guide to decide the amount of bleach you should add to the water, for example, 8 drops of 6% bleach, or 6 drops of 8.25% bleach, to each gallon of water. Double the amount of bleach if the water is cloudy, colored, or very cold.
    • Stir and let stand for 30 minutes. The water should have a slight chlorine odor. If it doesn’t, repeat the dosage and let stand for another 15 minutes before use.
    • If the chlorine taste is too strong, pour the water from one clean container to another and let it stand for a few hours before use.

Volume of Water

Amount of 6% Bleach to Add*

Amount of 8.25% Bleach to Add*

1 quart/liter

2 drops

2 drops

1 gallon

8 drops

6 drops

2 gallons

16 drops (1/4 tsp)

12 drops (1/8 teaspoon)

4 gallons

1/3 teaspoon

1/4 teaspoon

8 gallons

2/3 teaspoon

1/2 teaspoon


*Bleach may contain 6 or 8.25% sodium hypochlorite.

That will put you on the right track for making your water safe to drink. Also Do not forget to sanitize your containers!

Filters

Filters are a useful item. We have a few types. For personal use and in the Bug Out Bag, (More on that in a later). The Life Straw. Is a GREAT tool. Everyone has one and a spare filter. For the home if you can afford it, The Big Berkey Is the standard of the industry, But it is PRICEY…

Click here to continue reading at The Medic Shack.

Smart Survivalist: Low Cost Prepping – Your Survival on a Budget

Getting prepared at a low cost has always been a popular topic. Now that people have started to worry about the looming coronavirus pandemic, those who are unprepared are looking at getting prepared for the possibility of being quarantined for two to four weeks. Some have looked into their cupboards and realized (especially those living in big cities like New York) that they have nothing stashed because they are used to just hopping out and picking up what they need. Some have more money than others, but if you’re trying to stock up in a short amount of time your budget is limited. Here is The Smart Survivalist with Low Cost Prepping — Your Survival on a Budget. Canned beans, rice, and pasta are low cost staples. Make sure you have access to water and store some if you have space in case of power outages or other interruptions to your home water supply.

If you are only preparing for a 2-4 week quarantine, you can get by without having a full array of nutrition. For a short duration, you’re only worried about getting enough calories to survive through the period. For example, a 25 pound of oatmeal provides about 37,000 calories (not including adding milk, sugar or other toppings) or enough for almost 19 days at 2,000 calories per day. But you’ll need to eat almost seven cups of dry oats per day to get that many calories. So think about how much you’ll need to eat to feel full and how many calories you’ll have per day. Canned  beans tend to be rather high calorie per volume, so if you had oatmeal sometimes and beans other that would be more manageable from a caloric intake and fullness perspective. You may need to be creative to get a good variety of foods that fulfill your needs. And finally don’t forget hygiene products, too.

Low cost prepping is actually a doable task. We all should be prepared for the worst outcomes of today’s reality, but we don’t have to spend thousands of hard-earned dollars on survival equipment. It’s completely possible to just walk into Walmart, or Walmart’s counterpart in your country, and fill your survival list on a very small budget.

I’ve done my own research on this topic, and came up with a list of items that can make a big difference in disastrous events – yet each and every one of them does not cost more than five dollars. The items can be sorted into five important categories. I even took this research a few steps further and outlined ten of the cheapest and most useful of such items. And finally, I also discuss what necessary survival steps and techniques you can take without spending another penny…

All items on the low cost prepping list can be divided into 5 categories: first aid, water, food, hygiene items and emergency supplies. You might ask, do I need all of them? Well, a person can survive for 3 days without water, and as much as 3 weeks without food, but it would be a painful and probably lethal experience. And what if you are injured or running a fever? What if you are stuck on your roof for many days as your neighborhood is flooded?

As you can understand now, being fully prepared is a necessity. You will need the items that I am about to list, and trust me, I do not intend to suggest redundant or luxury items. These are the items that can be utilized when an actual disaster strikes, and all of them are on a budget. Just make sure you stock enough to last you at least a week. Also, before deciding on quantities, see how many members there are going to be in your group, and who they actually are. A child might need less food than a grown man…

s I mentioned earlier, you cannot survive for a long time without water. Fortunately, bottled water is cheap and non-perishable. You can stockpile as much as you need. You will need approximately 2 gallons for a person per day, which includes both drinking and sanitary needs. I would recommend buying even more than that, because you never know what might happen.

There is always the option of water purification, and I have written a thorough article about the best ways to purify water. Keep in mind, however, that some of the methods require additional investment, of time and/or money, while bottled water is always on a budget.

You can also stock on other low cost consumable liquids. Powdered milk costs less than $5, and one package is enough to prepare two gallons of milk. You can mix it with coffee and boiled water. Instant coffee and cappuccino mixes also cost under $5. This might not be your dreamy latte, but it’s something that can get you through a challenging day.

The total cost of products in the water category is no more than $30.

The most affordable and most reliable water filtering item is definitely LifeStraw (on Amazon). This award-winning tool has been globally recognized as a highly efficient water filter that allows you to drink any water directly. It’s ultralight, can be easly carried anywhere and nullifies the need for iodine tablets, as it removes 99.9999% of bacteries, parasites and pollutants. A trusty companion for every prepper and survivalist!…

Just like in case of water, you cannot survive without food. You need energy, nourishment, nutrients. For low cost prepping and for successful survival, we need to stockpile on food that costs less than $5 each and can last for years. It is also preferable to collect food that can be mixed with other food in order to create new dishes and break the monotony of identical dinners.

So first of all, there are cans. Canned goods can be your savior. You will need minerals and vitamins, but fresh vegetables and fruits expire quickly. The canned ones, however, can be consumed even if they are opened 2 years after they were packed. And these are the cans that I suggest to purchase:

  • Assorted beans. These can be chick peas, kidney beans, and several others. They fill you quickly and have tons of necessary protein.
  • Carrots (sliced)
  • Peas and carrots (a popular combination, and again a lot of protein)
  • Oranges or mandarins
  • Tomato sauce
  • Sliced potato
  • Lasagna
  • Mac and cheese
  • Cheese ravioli in tomato sauce
  • Italian pasta beef ravioli

In addition, there are foods that are not necessarily canned, but they can last for a very long time.

  • Pasta. This is an underrated food. Sure, it might seem boring, but it’s very cheap, very filling and can be prepared in minutes. You can always mix it with sauce or other goods. All in all, it’s a great source of carbs and energy.
  • Instant pudding (get several packs)
  • Flour – really inexpensive, you can make bread from it.
  • Sugar and salt – just keep them in dry places, don’t let them get wet!
  • Sardines
  • Ham
  • Chicken breast
  • Quaker
  • Raisins. Some don’t like them, but they are very nutritious.
  • Meatballs for pasta/spaghetti
  • Chicken pot pie soup
  • 5 pound bags of rice. Rice (particularly white one) can be stored away for a long period of time without going bad. It is very filling, very cheap and has tons of carbs to energize you when you most need it.
  • Peanut butter – a great calories source. Your body needs certain fats, and peanut butter has them. It’s delicious, and it provides you with additional energy that is needed for your survival.

The total cost of food mentioned here is no more than $175

Click here to read the entire article at The Smart Survivalist.

Related:

The Organic Prepper: How to Build a 30-Day Emergency Food Supply…Fast

Pantry Chart with shelf life (large image 1.5MB)

American Partisan: Water Purification in a Grid Down Situation

Lisa Vargas of I Need That to Prep has written a two part article at American Partisan on how to purify water in a grid down situation. Have safe water to drink is one of the most vital things you need to survive.

Water Purification In A Grid Down Situation – Part 1 (purification)

Water Purification In A Grid Down Situation – Part 2 (filtration)

An excerpt from the second article appears below:

WATER PURIFICATION IN A GRID DOWN SITUATION – PART 2

In this post, we will focus on ways to filter water as opposed to ways of purifying water.  As you learned in Water Purification in a Grid Down Situation – Part 1 the first article of this series, I posted; purifying water and filtering water are two different things.

If you are stuck in a situation where you don’t have clean water readily available, it is vital to know these various ways to either purify, or at least filter the water so you don’t get extremely sick, or worse.

Filtering water is similar to purifying water except that we are using physical barriers to get rid of dirt and grime in the water as well as bacteria and other microorganisms.

Remember, filtering water will not get rid of as many microorganisms as purifying water, so if you can, always boil the water after you have filtered it for extra protection.

In a survival situation, I’m always a big proponent of talking about the items that we can carry with us. High-quality water filters from a store will ensure that no harmful pathogens or microorganisms are getting into your drinking water.

But sometimes using store-bought, high-quality water filters might not be an option, unless you remembered to include a water filter in your bug out bag.

Meaning, if we are in a grid-down situation, you need to be able to utilize the things you have with you, or you need to be able to find items out in the open that you can use to pre-filter your water.

Filtering Water With A Cloth

Using various types of cloth to pre-filter water is going to be your best bet in any survival situation.   You can use socks, t-shirts, or anything that is cotton and tightly woven together.

You simply will pass the water through the cloth into another container in order to filter it.  This will remove many of the particulates and debris that you don’t want to drink.

One device that makes filtration super easy is the Millbank bag.  You can get one at Millbank Bags USA. They have a fantastic video below that shows step-by-step exactly how to use the Millbank bag to filter water.

It’s very simple and easy to use and is a perfect backup just in case something happens with your main water filtration method.

But just in case you don’t have a Millbank bag or something similar, I learned a great trick from an ex-military helicopter pilot that works wonders.  He showed me how to take a pair of old jeans, run one pan leg through the other, then use a zip tie to close off the bottom.

In this way, the old pair of jeans acts like a makeshift Millbank bag.  You can also use a primitive version of the Millbank bag which essentially is a cloth bag used to make nut milks.

You can add layers of sand and activated charcoal (if you have some in your bug out bag) in the sack to help filter the water.  You can learn more about making a homemade charcoal and sand filter here.

Once you’ve filtered your water, don’t forget to boil it if you can to make sure the water is 100% safe to drink…

AmPart: Simple Rainwater Catch System

American Partisan has posted a useful article for addressing your water needs – Plans and photos of a simple rainwater catch system. Rain catchment systems work most easily in areas that have rain fall throughout the year. If you live in an area with mostly seasonal rainfall, then you’ll need to empty your rain barrel into some kind of cistern in order to have water through the dry months.

When I think about preparedness and survival, I think about the primary priorities in order like this: Shelter, Water, Food and Security. The secondary priorities, once you’ve handled those first four, go like this: Medical, Intelligence, Communications and Transportation. I’m going to give you some plans for a simple way to start a rainwater collection system to allow you to check your water needs off the list. Try to remember as a starting rule that your survival group is going to need to plan for water usage to the tune of one gallon of water per person, per day. Sometimes this will obviously include some adjustments up and down for different cooking needs, sanitation, medical, etc., but generally speaking, that rule is a good starting point.

Before we start, also take into consideration your local water sources. I personally live in a very riverine area, though I’m not right on the water. So as long as I’ve done well for myself with transportation, that might be a good option for collecting water. However, I’ve also got a pretty reliable rainfall pattern (or so I say, as we are currently experiencing our first night of rain in eight weeks). Some of us can often count on decent rainfall, but it would behoove you to store water in the largest amount you can for those weeks (or months) when rain is scarce.

This type of simple system will allow you to funnel rainwater into your reservoir, and also collect from other sources and deposit it in the reservoir yourself. When it’s time to use it, or if you want to drain it into smaller ready-to-use jugs or bottles, it’ll need to be filtered/purified. My unpaid recommendation is to use a Berkey water filter for that, simply because the “black” filters that company uses are able to filter a very large amount of water before they need to be replaced. Simply take the water from your collection system, pour it through a Berkey or some similar filtration system, and it’ll be ready to drink. Without filtering, the water can be used for garden irrigation, pets, possibly even hygiene.

Below you’ll see the parts you’ll for this simple build laid out on our table. There we have a 1/2″ metal hose adaptor and a 1/2″ spigot. You’ll need two PVC bushings to go onto those and a pair of rubber washers, one for each bushing. Get some Teflon tape to wrap the metal threads of the hose adaptor and spigot. Get a length of garden hose to attach to the hose adaptor later as an overflow valve. I have some black plastic mesh screen and a couple of bungee cords to make a top screen. Use a power drill and a 13/16 spade bit for drilling holes in the barrel. My barrel I’m using is a food grade 55 gallon barrel that I’m told contained Mountain Dew before it came to me. Some sources will have the top cut off for you, but you can use a jig saw or a saws-all to remove if you need to. I advise using food grade plastic rather than something that could rust. Lastly, you need a short length of garden hose, at least three feet, and make sure it’s still got the attachment on one end.


Use your drill bit to drill out two holes in the barrel. One hole needs to near the bottom, which is where the spigot will eventually go. Three inches from the bottom should be ok, but don’t go too much higher. You don’t want to lose access to several inches of water in the bottom. The next hole needs to be near the top, offset at least 90 degrees from the bottom hole. This will be your overflow outlet, hopefully overflowing into another container via the hose you’ll attach later. It needs to be offset because we will assume that you will eventually pair this barrel with a second one catching your first barrel’s overflow, and you don’t want it blocking the spigot below.


With the only section of this project that I would call “work” behind you, you’re ready to attach your pieces. Get your Teflon tape and wrap the threads on the narrower end of the hose adaptor, the threads that are going inside the barrel. Take your hose adaptor and push that side through your top drilled hole. If the hole is tight, you might have to screw it in. Reapply Teflon tape if you have to. On the inside, place a rubber washer and then screw the PVC bushing onto the metal adaptor.


You’ll follow the same process for the spigot at the bottom. Wrap the metal threads with Teflon tape and push the spigot into the hole. You may need to screw the spigot in if the hole is a tight fit, and if so, make sure the Teflon tape is still in place afterward. Position a rubber washer on the inside and screw the bushing into place.


Take your overflow hose and attach it to the hose adaptor you installed at the top. This hose will drain water into a second container when this container is full.


Secure the mesh screen around the top of the barrel using your bungee cords. You’ll need to purify this water coming out before drinking it anyway, but this mesh can prevent leaves, sticks and some bugs or animals from getting inside.


Here is your finished product!


Some notes:

Once you get the system built, fill the barrel all the way up to the overflow hose and let it run out for a few minutes. You’re checking for leaks, especially at the bottom around the spigot. That kind of water pressure is likely to cause a leak in that bottom area, so then drain the barrel and take some silicon, caulk or other sealant and seal the leak on the inside and outside. Your overflow hose attachment isn’t nearly as likely to leak, nor will it matter as much if it does. There is much less pressure at the top hole than at the bottom. Once your sealant has dried, fill the barrel again and look for leaks…

Click here to continue reading at American Partisan.

Related:

PennState Extension: Rainwater Cisterns: Design, Construction and Treatment

State of Texas: The Texas Manual on Rainwater Harvesting (pdf) This is an eighty-eight page manual covering many aspects of rain harvesting. A little of the data is Texas-specific, such as rainfall maps.

Wilderness Doc: Hydration and Rehydration

While hydration may seem more like a summer topic, cold, dry weather can cause a decrease in thirst, making it easier to become dehydrated. Here’s an article from Wilderness Doc on Hydration and Rehydration, including using a nasogastric tube for severely dehydrated patients. While Doc doesn’t discuss it in this article, there is also the option of emergency rectal hydration for patients who are unconscious, suffering nausea, or in shock.

Hydration aka water…essential for life. We take for granted this vital substance which we cannot live without. In much of the world, however, clean drinking water is a luxury. In a previous post, I have discussed how to make this water safe to drink. In this post, I want to examine what you might be able to do for yourself or a companion should you become dehydrated.

Oral rehydration is the standard way to rehydrate. This can be accomplished with small sips of water, Gatorade or, in dire circumstances, whatever you have at hand. If you have more resources, making an oral rehydration solution is even better. There are several options to make this. The two most common start with a quart of clean water to which the following is added:

Option 1: One teaspoon of salt, 8 teaspoons of sugar. Mix, then add 0.5 cup orange juice or half a banana (mashed).

Option 2: One-fourth teaspoon of baking soda, 1/4 teaspoon salt. Mix. Add 2 tablespoons of sugar or honey. Mix again. Add 0.5 cup orange juice or half a banana (mashed).

Ideally, the dehydrated patient will drink at least 3 quarts of this solution daily until the diarrhea or other source of dehydration ceases.

Unfortunately, the severely dehydrated patient may refuse or be physically unable to drink the solution. In those cases, consider a nasogastric tube feeding for these patients. Most people are able to easily place such a tube with some lubrication either through KY or other water soluble lubricants applied either to a standard NG tube or to IV tubing or any relatively clean piece of small caliber, flexible tubing. Be sure to test placement by listening over the stomach while blowing into the mouth end (proximal end) of the tube and hearing bubbles in the stomach. You should also start out with a very small (less than 5 ml) test infusion. If coughing occurs, check placement again as you do not want to introduce the solution into the lungs and potentially produce a pneumonitis. The amount of fluid to administer for adults is calculated by adding the patient’s weight in kg’s to 40. An 80 kg patient would need 80+40=120 ml/hr of the oral rehydration fluid. This would be continued until the patient is able to drink the solution on their own, without aid of the tubing.

While there are examples of WWII POW’s utilizing sharpened bamboo sticks and rubber tubing to fashion IV’s, the risk of infection from this would be very high. Further, the art of finding a vein in such a severely dehydrated patient is one most, even with modern and sterile equipment do not possess. If things are so bad as to even consider such a situation, it is likely natural processes will not be stopped. So, while an interesting thought experiment, I would recommend you think more about and ensure adequate knowledge of the above skills instead…

Doom and Bloom: Boiling Water – How Long to Disinfect?

The Altons at Doom and Bloom Medicine have another fine article up, this time on boiling water and how long it takes to disinfect it.

BOILING WATER FOR DISINFECTION

a pan and water boiing on the top of a stove

You and I know that we need water to live, but the quality of that water is important. So important, as a matter of fact, that it could mean the difference between good health and life-threatening disease. Sickness caused by contaminated water has stopped armies in their tracks and changed the course of history.

How long do you have to boil water for it be safely drinkable?

The old saying goes “ask a bunch of doctors the same question, get a bunch of answers”. You ask a bunch of survivalists about boiling water, well, you might get a bunch of answers. If you consider that the fuel and time required to boil water might be limited in certain survival scenarios, however, it’s a serious question.

There are all sorts of disease-causing microbes, also called pathogens, that are harmful to humans and can be found in water. These include protozoa, bacteria and viruses. The protozoal microbes that could get you sick include cryptosporidium and giardia. Harmful bacteria include salmonella, shigella, and e. coli. Viruses that contaminate water include things like hepatitis, enterovirus, and norovirus.

There are various ways to disinfect water. Bleach is popular, iodine will work, and UV sterilization using direct sunlight on clear bottles of water for a good 8 hours is another way. Of all ways you can disinfect water, however, the Centers for Disease Prevention and Control (the CDC) recommends boiling as the best method. They have an excellent PDF you can download, by the way, called Drinking Water Treatment Methods for Backcountry and Travel Use”.

The CDC believe that none of the methods other than boiling are 100% effective in killing all disease-causing bugs. Even bleach takes several days to kill some organisms like cryptosporidium, something we talked about on the Survival Medicine podcast a few months ago. Of course, The CDC (and I) suggest that cloudy water should be filtered as well as disinfected. You can improvise a filter but some popular commercial lightweight filters include the Mini-Sawyer and theLifestraw

Click here to continue reading at Doom and Bloom Medical.

Futurewise Appeals Benton County Comprehensive Plan

From the Tri-City Herald’s article Benton County’s out of water. Growth should be frozen, group says.

Improperly planned growth in Benton County could overtax the Yakima River and other water sources, harming fish, wildlife, waterways and senior water rights holders, an environmental watchdog group says.

Futurewise, formerly 1000 Friends of Washington, is asking the Growth Management Hearings Board for Eastern Washington to review the comprehensive plan Benton County commissioners approved in February, saying it fails to comply with the state’s Growth Management Act on several fronts.

In a petition filed last week, Futurewise claims Benton County didn’t properly analyze the effect 6,800 new people in unincorporated areas over 20 years would have on the county’s limited water resources.

It also says Benton County also failed to analyze the effect of growth on state roadways and work with the state to mitigate them…

The petition triggers a three-person review board, with at least two Eastern Washington residents. A hearing will likely be held in late fall, and the board has 180 days from the April 19 filing date to issue a binding decision…

Continue reading at the Tri-City Herald by clicking here.

From Futurewise’s web site:

….Water resource planning efforts in the lower Yakima River have made clear that water in Benton County is already allocated and flows in the river are too low for salmon and steelhead outmigration and rearing.

This appeal will be the first to address the applicability of the State Legislature’s so-called Hirst fix bill (SB 6091) to planning for growth in the Yakima River basin.  According to the bill, counties in the Yakima basin are mandated to plan for the use of land consistent with available water resources under the Growth Management Act (GMA)…

Cape Town Running Out of Water and SA Land Appropriation

Cape Town, South Africa is expected to run out of water by April 22nd, 2018 due to drought.

One of South Africa’s largest cities, Cape Town, could be the world’s first major municipality to run out of water due to an unprecedented drought.

The city, which is also an iconic tourist destination, has less than a 90-day supply of water left in its reservoirs, meaning residents are forced to ration by taking short showers, flushing the toilet only when necessary and recycling bathing water.

“Day Zero” (or April 22) is when authorities predict the taps will run dry, leaving city officials scrambling to build desalination plants and drill underground water wells.

The drought has been caused by very low rainfall over the past few years and increased water consumption by the city’s growing population.

Cape Town Mayor, Patricia De Lille said its four million residents have to start drastically cutting down on their water. The capped household water usage at 87 litres per person, per day and residents will be fined if they break the rules.


Also weighing heavily in South African news, concerns over uncompensated land expropriation continue to heat up.

South Africa could turn into the ultimate paradise if the implementation of the policy of expropriation of land without compensation leads to higher food production, ANC president Cyril Ramaphosa said in Nongoma, Kwazulu-Natal on Sunday.

“In fact, it is possible for us to begin a process of working the land and improving agriculture – making it a very successful factor in our country,” Ramaphosa said, addressing King Goodwill Zwelithini at Osuthu Palace – explaining the ANC’s decision to implement a policy of land expropriation.

Ramaphosa emphasised that the implementation of the ANC’s policy must not harm the economy, the agriculture sector or food security.

“We can make this country the garden of Eden,” the new ruling party head said at a meeting to introduce the ANC’s new top six leaders to the Zulu king. Ramaphosa said redistributed land must be used productively. He estimated that increased food production could grow the economy by two million jobs…

Above sourced from news24.com

The fight for the land ownership is reaching heated levels apparently – it’s “war against the Boer Afrikaner people”, the Boer Afrikaner Volksraad had warned the ANC.

The Afrikaner activist group says it will not recognise any law that makes nationalisation of land without compensation legal, even if it comes from parliament.

“Deprivation, dispossession and occupation of our country in terms of any law shall be considered formal acts of war against the Boer Afrikaner people, which we have to defend against and retaliate with internationally accepted means and methods in order to ensure our ownership and recovery,” wrote the organisation in Afrikaans.

This after the EFF on Tuesday called for the expropriation of land without compensation in parliament. The motion was tabled by EFF leader Julius Malema, who called for black people to unite in ensuring that section 25 of the constitution is amended so to make it constitutionally possible to nationalise the South African land without compensation.

Above sourced from citizen.co.za

National Preparedness Month, Week 1, 2017

Don’t Wait. Communicate. Make a family emergency plan today. September is National Preparedness Month. Learn more at www.ready.gov/September.

Related:

Long Term Water Storage

Myths and Facts of Water Storage

Pool Shock & Bleach for Water Purification

Granular Calcium Hypochlorite

Only use HTH Pool Shock that does not have any algicides or fungicides.  Ingredients should reads CALCIUM hypochlorite and inert ingredients.  Use a brand with at least 73% Hypochlorite.

For this video I used Poolife Turboshock, but feel free to use any brand you wish as long as it fits the perimeters above.

Before you begin mixing any chemicals in any way, please follow basic safety precautions.  Make sure you do this in a ventilated area.  Have plenty of water to dilute any mistakes.  Wear eye protection for splashes.  Lastly always mix the powder into the water NOT the other way around.

Add and dissolve one heaping teaspoon of high-test granular calcium hypochlorite (HTH) (approximately 1/4 ounce) for each two gallons of water.

The mixture will produce a chlorine solution of approximately 500 mg/L (0.0667632356 oz per US gallon), since the calcium hypochlorite has an available chlorine equal to 70 percent of its weight.

To disinfect water, add the chlorine solution in the ratio of one part of chlorine solution to each 100 parts of water to be treated. This is roughly equal to adding 1 pint (16 oz.) of stock chlorine to each 12.5 gallons of water to be disinfected.

To remove any objectionable chlorine odor, aerate the water by pouring it back and forth into containers to add air.

Chlorine Bleach

Common household bleach (unscented) contains a chlorine compound that will disinfect water. The procedure to be followed is usually written on the label. When the necessary procedure is not given, find the percentage of available chlorine on the label and use the information in the following tabulation as a guide.

Available Chlorine Drops per Quart of Clear Water

  • 1% needs 10 Drops
  • 4-6% needs  2 Drops
  • 7-10% needs 1 Drops

(If strength is unknown, add ten drops per quart of water. Double amount of chlorine for cloudy or colored water)

The treated water should be mixed thoroughly and allowed to stand for 30 minutes. The water should have a slight chlorine odor; if not, repeat the dosage and allow the water to stand for an additional 15 minutes.